6 Best Permanent Markers For Labeling Dye Containers
Choosing the right marker is vital for labeling dye containers. We review 6 top-rated, smear-proof, and fade-resistant options for lasting, clear organization.
Labeling dye containers might seem like a mundane chore, but for any dyer, it is the difference between a perfectly color-matched sweater and a ruined skein. When you are working with reactive dyes or acid powders, the container label is your only safeguard against cross-contamination. Investing in the right permanent marker ensures your inventory remains organized even after repeated exposure to steam and spills. These six markers offer the reliability needed to keep your dye studio running smoothly.
Sharpie Industrial: Best for Extreme Durability


When you are handling heavy-duty dye stock solutions, you need a marker that won’t quit. The Sharpie Industrial is designed for high-heat environments and resists fading when exposed to the intense steam of a dye pot.
Unlike standard office markers, this ink formula is specifically engineered to adhere to non-porous surfaces. It holds up remarkably well even if you accidentally splash a bit of vinegar or citric acid on the label.

The tip is robust and resists fraying, which is a common issue when labeling rough plastic lids. If you are prepping a large batch of colorways for a craft fair, this is the tool that keeps your labels legible from start to finish.
Sakura Pigma Micron: Best for Precision Labeling
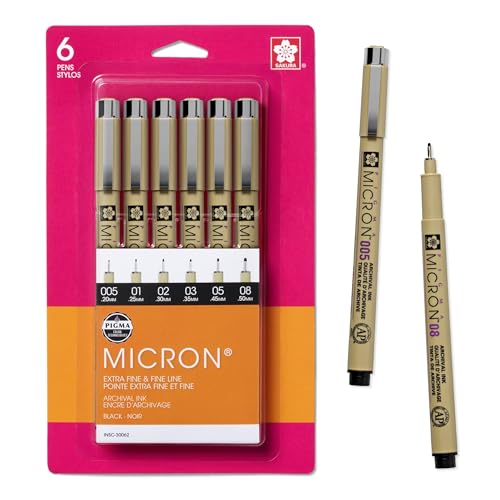
Sometimes you need to write more than just "Blue" on a tiny vial. If you are tracking specific dye percentages or batch numbers, the Pigma Micron provides the archival-quality precision required for detailed record-keeping.
These pens are famous for their consistent ink flow, which prevents the "blobbing" that often ruins a label. Because the ink is pigment-based, it resists chemical breakdown better than standard dye-based markers.
Keep in mind that these are not as rugged as industrial markers; they are best kept on a clean shelf rather than tossed into a messy dye bin. Use these for your master inventory log or for labeling small sample jars where space is limited.
Staedtler Lumocolor: Best for Smooth Plastic Surfaces
Plastic dye jugs can be notoriously slick, causing many markers to bead up or smear upon contact. The Staedtler Lumocolor is a professional-grade permanent marker that thrives on these difficult, non-porous surfaces.
The ink dries almost instantly, which is a lifesaver when you are in the middle of a frantic dye session. It also features a "dry safe" design, meaning the cap can be left off for days without the tip drying out.
This is the marker I recommend for those who prefer to write directly on the plastic container rather than using paper labels. It offers a clean, crisp line that survives the inevitable humidity of a fiber arts studio.
DecoColor Paint Marker: Best for Opaque Visibility

If you use dark-colored containers or opaque plastic jugs, standard black ink will often disappear into the background. The DecoColor Paint Marker uses actual paint, providing an opaque, high-contrast finish that stands out clearly.
This marker is excellent for labeling glass jars or dark blue HDPE plastic. Because it is a paint-based medium, it is significantly more resistant to abrasion and chemical solvents than traditional markers.
You will need to shake the marker to activate the paint, which can be a bit of a nuisance during a busy project. However, the trade-off is a label that remains readable even after months of being handled with damp, dye-stained hands.
Pilot Permanent Marker: Best for Everyday Utility

The Pilot Permanent Marker is the reliable workhorse of the dye studio. It is readily available, affordable, and performs consistently across a wide variety of plastic types.
While it may not have the chemical resistance of an industrial-grade marker, it is more than sufficient for general dye storage. Its dual-tip design is particularly useful, allowing you to switch between bold headings and finer notes on the same label.
If you are just starting your journey into hand-dyeing yarn, this is the most practical choice to keep in your kit. It balances cost and performance perfectly for those who are still experimenting with different dye types.
BIC Intensity: Best for Quick-Drying Performance

When you are labeling dozens of containers in a row, you cannot afford to wait for ink to dry. The BIC Intensity is designed for speed, setting almost immediately upon contact with the surface.
The grip is comfortable for long labeling sessions, which matters when you are cataloging your entire stash of primary colors. The ink is also quite bold, ensuring that your labels are easy to read from across the room.
The only downside is that the ink can be slightly more prone to smudging if exposed to harsh solvents like concentrated alcohol. For water-based dye storage, however, it is an excellent and highly efficient option.
Why Ink Permanence Matters for Dyeing Chemicals
In the world of fiber arts, a misidentified dye can lead to catastrophic results. If you mistake a deep navy for a black, your entire project’s color palette is compromised.
Chemicals like soda ash or urea, when stored in containers, can be corrosive to low-quality marker ink. If your label fades or wipes away, you are essentially gambling with your materials.
Permanence is not just about aesthetics; it is about safety and consistency. Always prioritize markers that specify "water-resistant" or "chemical-resistant" to ensure your studio remains a controlled environment.
How to Prevent Smudging on Plastic Dye Containers
Even the best permanent marker can smudge if the plastic surface is oily or dusty. Before you label a container, wipe it down with a bit of rubbing alcohol to remove any residual grease.
If you are worried about the ink wearing off over time, apply a small piece of clear packing tape over the writing. This creates a physical barrier that protects the ink from friction and moisture.
Avoid using masking tape or painter’s tape, as the adhesive often degrades in high-humidity dye studio conditions. A clean plastic surface and a high-quality marker are usually enough to keep your labels intact for years.
Testing Marker Resistance Against Dye Bath Heat
If you store your containers near your dye pots, they will be subjected to fluctuating temperatures and steam. Before trusting a marker for your entire inventory, perform a simple "stress test."
Label a scrap piece of plastic with the marker and place it near your heat source for an hour. If the ink smears or softens, it is not suitable for high-heat storage.
Remember that steam is a powerful solvent. A marker that works perfectly in a dry room may fail under the constant moisture of a professional dye kitchen.
Best Practices for Organizing Your Dye Studio
Consistency is the secret to a professional-looking dye studio. Use a standardized labeling system that includes the dye brand, the color name, and the date of purchase.
Keep your most-used dyes at eye level and use bold, high-contrast labels for quick identification. This reduces the time you spend searching for materials and keeps your focus on the actual knitting or dyeing process.
Finally, audit your labels every few months. Even the best markers can fade over time, and regular maintenance prevents the confusion that comes with illegible containers.
Keeping your dye studio organized is an investment in your creativity and your peace of mind. By choosing the right permanent marker, you eliminate the risk of accidental color swaps and ensure your workflow remains uninterrupted. Whether you prioritize precision or extreme durability, there is a tool here that fits your specific needs. Take the time to label well, and you will spend much more time enjoying your beautiful hand-dyed yarn.