6 Best Label Makers For Botanical Organization To Try
Organize your indoor jungle with ease. Discover the 6 best label makers for botanical organization and keep your plant collection perfectly labeled today.
A organized stash is the secret to maintaining sanity when working with diverse fiber contents, natural dyes, and botanical mordants. Whether categorizing dried indigo leaves or tagging jars of gathered tansy and madder root, clear labeling prevents the frustration of guessing what is inside a dusty container. Proper identification protects precious materials from being forgotten or incorrectly mixed during a dye session. These six label makers provide the precision needed to keep a botanical studio functioning at the highest level.
Brother P-touch Cube Plus: Best for Tech-Savvy Dyework


This device excels for those who prefer managing their labels through a tablet or smartphone rather than a clunky built-in keyboard. It connects via Bluetooth, allowing for intricate font adjustments and the integration of custom icons that can help identify specific plant species at a glance.
The software interface allows for precise spacing, which is essential when printing long names like Anthemis tinctoria or specific pH-sensitive mordant ratios. Because the design happens on a larger screen, one can easily batch-print entire sets of labels for a season’s harvest in one sitting.
The main tradeoff here is the reliance on a secondary device and a stable Bluetooth connection. If a tablet battery dies mid-session, the workflow stops entirely. However, for those who value clean typography and detailed categorization, this remains the superior choice for high-volume organizational tasks.
DYMO LabelManager 160: Best Handheld for Quick Tags

Simplicity remains the greatest strength of the LabelManager 160. There are no menus to navigate or apps to sync; it is a straightforward, typewriter-style interface that works the moment batteries are inserted.
When handling messy dye powders or sticky resins, a simple, wipeable device is often preferable to an expensive touchscreen. This model is ideal for grabbing a quick, legible label for a jar of alum or cream of tartar without worrying about damaging sensitive electronics.
While it lacks the decorative fonts or high-end graphics of modern app-based models, its durability in a busy studio environment is unmatched. The bottom line: if the goal is functional, utilitarian labeling without the fuss, this handheld unit performs every time.
Phomemo D30: Best for Stylish, Ink-Free Jar Labels

The Phomemo D30 uses thermal printing technology, which eliminates the need for messy ink cartridges or toner ribbons. It is remarkably compact, fitting easily into a project bag or the side pocket of a supply shelf.
The aesthetic of these labels leans toward minimalist and boutique, making them perfect for those who want their dye kitchen to look curated. The labels are generally water-resistant and tear-proof, which is a major advantage when stored in damp areas where natural dyes often live.
It is important to note that the proprietary labels for this machine are specific; one cannot simply swap in standard office supply store tape. For the knitter who wants labels that look like they belong in a professional apothecary, this is the most stylish option.
Brother PT-D210: The Best All-Around Value Option
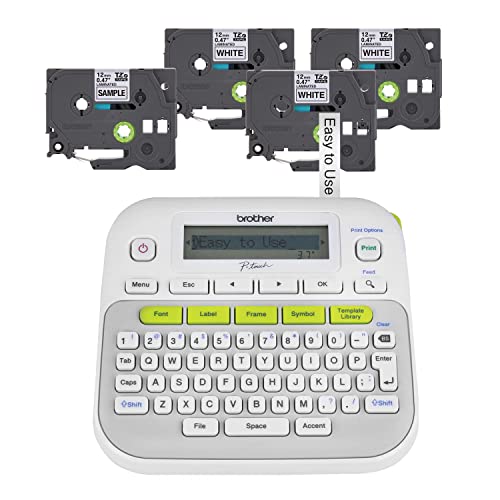
The PT-D210 strikes the perfect balance between ease of use and advanced features. It features a physical QWERTY keyboard that feels responsive and intuitive, making it a reliable workhorse for standard, everyday organizational tasks.
Unlike budget handhelds, this model includes enough memory to save frequently used phrases, such as “Mordanted – Alum” or “Dye Lot #42.” This saves significant time when processing large quantities of fiber that require consistent identification.
While it is slightly bulkier than smaller handheld options, the stability of the device when placed on a table makes typing labels much more comfortable. It is the gold standard for those who want a long-term, reliable tool that handles everything from pantry jars to fiber bins without unnecessary complexity.
DYMO LetraTag 100H: The Best Budget-Friendly Choice
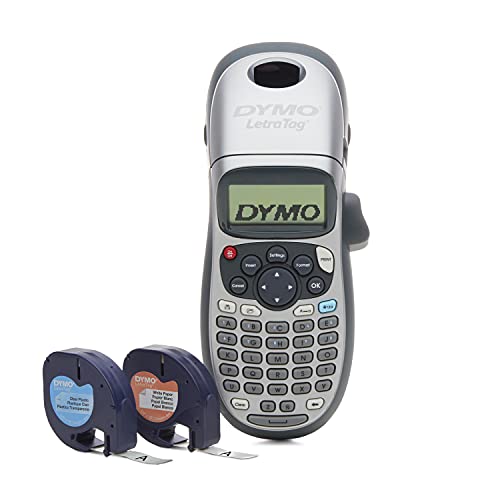
For the knitter who is just beginning to organize their botanical supplies, the LetraTag 100H offers essential functionality at a very accessible price point. It provides enough formatting options, such as bold, underline, and vertical printing, to keep a stash well-categorized.
The screen is basic, but the menu navigation is logical and quick to master. One of the primary advantages of this unit is its size; it is slim enough to fit into a tool kit, ensuring that labels can be printed directly in the garden or the dye studio.
Understand that budget-friendly units often consume batteries faster than their more expensive counterparts. Keep a spare set of batteries nearby to ensure that an organizational project isn’t interrupted by a sudden loss of power.
Epson LabelWorks LW-PX300: Best for Outdoor Durability
Botanical labels often face harsh conditions, including exposure to heat, humidity, and the occasional spill of caustic substances. The Epson LW-PX300 is designed specifically for this kind of heavy-duty environment.
The tapes available for this machine are engineered for high-heat and chemical resistance, which is critical when marking containers that sit near a dye vat or in a sun-drenched greenhouse. These labels are designed to stay adhered to textured surfaces, such as plastic buckets or glass jars, even in fluctuating temperatures.
This model is a higher investment, but the durability of the output is unmatched. For the serious dyer who needs labels that will survive for years of seasonal reuse, this is the only logical choice.
How to Pick a Label Maker for Your Dye Studio & Garden
When choosing a device, consider the environment where the labels will reside. If the studio is prone to high humidity, look for machines that support laminated or UV-resistant tapes.
Think about the workflow as well: * The Batch Processor: Needs a machine that connects to a phone or tablet for bulk label production. * The On-the-Go Maker: Needs a lightweight, battery-operated handheld that fits in a pocket. * The Permanent Organizer: Prioritizes tape variety and label longevity over fancy fonts.
Never prioritize design features over durability if the labels are meant for wet or dusty environments. A pretty label that peels away after two weeks is worse than no label at all.
Thermal vs. Laminated Labels: Which Should You Use?
Understanding the printing technology is vital for the longevity of your labels. Thermal labels rely on heat-sensitive paper; they are inexpensive and quick but can fade or darken if left in direct sunlight or exposed to extreme heat.
Laminated labels consist of a protective film over the printed text, making them impervious to water, grease, and mild acids. This makes them the obvious choice for dye studio chemistry: * Thermal: Best for dry storage, pantry organization, and indoor seed jars. * Laminated: Best for dye buckets, mordant containers, and outdoor equipment.
If you are unsure of the application, always opt for laminated tape. The slight increase in price is offset by not having to re-print labels every few months.
Beyond the Plant Pot: Creative Labeling for Fiber Arts
Labeling extends far beyond just jars of botanical matter. Use your label maker to track essential information on your knitting projects, such as needle size, yarn weight, and the specific fiber blend used for a shawl or sweater.
Apply a small, discreet label to the inside of a project storage bag to remind yourself of the gauge or the number of rows remaining in a repeat. This is especially helpful if you are working on a complex lace pattern that gets put aside for weeks at a time.
Labeling the containers for your circular and double-pointed needles also ensures that your workspace stays tidy. A quick tag on a bin indicating “2.25mm to 3.00mm” keeps your most used tools organized, so you can spend your time knitting rather than searching for the right needle.
Making Your Botanical Labels Last: Pro Tips for Use
To ensure maximum adhesion, always clean the surface of the container with rubbing alcohol before applying a label. Any residual dust or natural oil from your hands will cause the adhesive to fail prematurely.
If applying labels to curved glass or plastic jars, position the label vertically rather than wrapping it horizontally around the curve. This prevents the edges of the label from lifting as the adhesive settles into the curve.
Finally, consider using a clear piece of packing tape over the label if you are working in an area prone to frequent splashing. This adds an extra layer of protection against water and chemicals, keeping your carefully researched labels intact for years.
The investment in a high-quality label maker is an investment in the longevity and efficiency of your fiber arts practice. By selecting the right machine for your specific studio needs, you ensure that every botanical extract and yarn skein is exactly where it needs to be when inspiration strikes.