6 Best Textile Markers For Fabric Labeling To Try
Discover the 6 best textile markers for fabric labeling in our expert guide. Find the perfect tool for your DIY projects and start creating today. Read more now.
Labeling handmade garments is the final step in elevating a project from a simple hobby piece to a professional-grade heirloom. Whether marking a swatch for testing or adding a discreet name tag to a gift, the wrong pen can migrate through the fibers or fade after the first soak. Choosing the right tool requires balancing the texture of the yarn with the permanence of the ink. These markers provide the stability needed to ensure your hard work stays identified for years to come.
Sharpie Stained Fabric Marker: Most Versatile


These markers are a staple for a reason, as the ink is specifically engineered to resist washing and fading on a variety of textile surfaces. The brush-like tip allows for a surprising amount of control, making it possible to write legibly even on the slightly fuzzy surface of a wool-blend yarn.
If the goal is to label a project bag or a sturdy canvas label, this is the gold standard. The ink flows smoothly without grabbing at the fibers, which prevents the messy “spider-webbing” effect common with inferior pens.
Keep in mind that on very fine, high-twist luxury fibers like silk or cashmere, this marker might feel slightly thick. Test on a swatch first to ensure the ink stays crisp rather than spreading into the neighboring stitches.
TULIP Dual-Tip Fabric Markers: Best for Detail

The primary advantage of these markers lies in the dual-tip design, offering both a fine point for lettering and a wider side for filling in larger areas. This versatility is essential when labeling different components of a garment, such as neck labels or hidden care instructions.
For those who enjoy personalizing their labels with intricate details or small motifs, the fine point is exceptionally precise. It maintains a clean line even when moving across slightly uneven textures, such as a traditional cable-knit swatch.
Because the ink is designed for permanent bond, it handles multiple washings well. Just ensure the surface is completely flat and stable during application to get the most consistent result.
Crayola Fabric Markers: Best Budget-Friendly Pick
Often overlooked by adult makers, these markers are surprisingly effective for labeling projects intended for children or quick prototypes. They are an ideal choice for the casual crafter who wants to label a project without investing in specialty professional gear.
While they lack the heavy-duty permanence of industrial markers, they hold up well through light cleaning. They are especially useful for marking test swatches where the information may eventually be discarded or overwritten.
Consider these for marking cotton or linen items that will see frequent, gentle laundering. They are a reliable option for those who prioritize accessibility and ease of use over extreme long-term archival permanence.
Sakura Pigma Micron Pen: For Ultra-Fine Lines
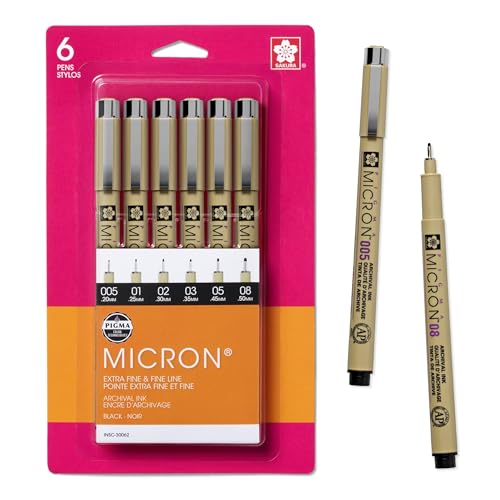
When the goal is to write a tiny, legible label on a small piece of twill tape, the Sakura Pigma Micron is unrivaled. The archival-quality ink ensures that names or dates remain vibrant even after years of storage or seasonal rotation.
This pen is favored for its ability to produce consistent, hair-thin lines that do not bleed into the fabric weave. Because the ink is pigment-based, it behaves like paint rather than a dye, meaning it sits on top of the fiber rather than soaking deep into the yarn structure.
Use this when precision is the highest priority. It is perfect for tiny, discreet labels tucked inside a neckline that shouldn’t show through to the front of a delicate lace shawl.
Dritz Fine Point Pen: A Quilter’s Top Choice
Though originally designed for quilting, this pen is a secret weapon for knitters who need to make temporary or permanent marks on light-colored fabric tags. It features a fine, rigid tip that navigates the intersection of fabric weave without snagging.
The flow is exceptionally controlled, which prevents the dreaded ink blobs that can ruin a nearly finished project. It is particularly effective on smooth cotton or polyester blends used for sewing custom tags onto hand-knitted items.
Because the ink is designed to withstand the rigors of fabric handling and pressing, it provides peace of mind for projects that require long-term care. It is a reliable, no-nonsense tool that delivers exactly what it promises every time.
Arteza Fabric Markers: Best for Color Variety
If the objective is to color-code your yarn stash or personalize your project labels with vibrant colors, this set is the superior choice. The pigment is rich and opaque, allowing for visibility on darker fabric labels where other markers might disappear.
The range of colors allows for creative organization, such as using specific colors to denote different needle sizes or fiber contents. This adds a layer of visual utility to your organization system that goes beyond simple text.
These markers perform best on natural fibers like cotton and linen. The ink remains flexible after drying, meaning the label will not crack or become stiff over time, even on soft fabrics.
How to Properly Heat-Set Your Fabric Marker Ink
Heat-setting is the non-negotiable step that transforms fresh ink into a permanent mark. Once the ink has dried completely—usually after a few hours—place a scrap piece of cotton over the writing.
Use a dry iron on the appropriate setting for the fabric, usually medium-to-high, and press firmly for about 30 seconds. Do not move the iron back and forth, as this can smudge the ink before it is fully locked into the fiber.
This process essentially cures the binding agents within the ink, making them resistant to water and detergents. Always perform this on a flat, hard surface to ensure the heat is evenly distributed across the entire mark.
Choosing a Marker: Tip Shape, Ink, and Fabric
Selecting the right marker comes down to the texture of the fabric and the desired permanence of the label. For porous, thick yarns, a broader tip with thicker ink is necessary to prevent the ink from getting lost in the twist of the ply.
For labels sewn onto high-twist or superwash wools, opt for a fine-point, pigment-based ink that will sit on the surface. If you are marking directly onto a yarn label or a cardboard tag, almost any marker will work, but permanent ink is preferred for longevity.
Consider the “bleed” factor: natural fibers like cotton absorb ink more readily than synthetics like acrylic. Always test on a small, hidden scrap of the same material before committing to the final label.
Pro Tips to Prevent Your Marker From Bleeding
Bleeding is almost always caused by too much ink being deposited into a thirsty fabric. To prevent this, use a steady, light hand and keep the marker moving in one direction rather than hovering over a single spot.
Placing a piece of cardboard or a scrap of heavy paper underneath the fabric layer while writing is essential. This prevents the ink from soaking through to the underlying surface and ensures a clean, crisp edge on your lettering.
If you find that your chosen pen is still spreading, try using a slightly faster motion. The less time the tip dwells on one spot, the less opportunity the ink has to migrate through the absorbent fibers.
Fabric Pen vs. Sharpie: When to Use Which One
A standard Sharpie is excellent for marking plastic, metal, or non-porous surfaces like needle cases and storage bins. However, because its solvent-based ink is designed for non-textiles, it often “feathers” or spreads when used directly on soft, loose-weave fibers.
In contrast, true fabric markers contain binders designed to adhere to the cellular structure of fibers, preventing the ink from drifting as the garment flexes and moves. When labeling your final hand-knitted project, the specialized fabric marker will always yield a cleaner, more professional look.
Save the standard Sharpie for your organization and project-planning notes. Keep the dedicated fabric markers solely for the labeling of your finished garments to ensure the archival quality of your hard work.
Selecting the right marker is a small detail that makes a world of difference in the longevity and professionalism of your fiber arts projects. By matching the tip, ink type, and heat-setting technique to the specific fabric you are labeling, you ensure that your work remains identifiable for years. Investing in these specialized tools ultimately pays off in the pride felt when pulling a well-labeled, heirloom-quality garment from the closet.