7 Best Pressing Tools For Crisp Template Seams Worth Using
Achieve professional, crisp template seams every time with these 7 essential pressing tools. Upgrade your sewing toolkit and shop our expert recommendations today.
Achieving professional-grade finish on handmade garments often hinges on the quality of the press rather than the speed of the stitch. When sewing knitted components or assembling fabric projects, seams often look bulky or amateurish if they aren’t properly flattened and set. Investing in the right tools transforms a garment from a DIY experiment into a polished, store-quality piece. These seven essentials bridge the gap between simple construction and true craftsmanship.
Clover Hardwood Tailor’s Clapper: The Pro’s Secret
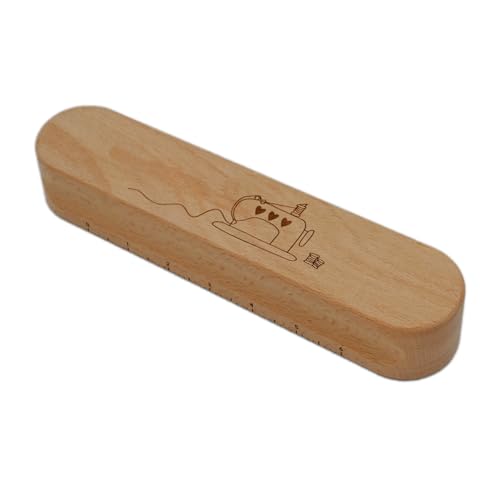

The tailor’s clapper is the secret weapon for those who demand flat, crisp seams without the risk of scorching fabric. By trapping steam inside the fiber of a seam allowance, this heavy hardwood block forces the seam to lie perfectly flat as it cools.
This tool is indispensable when working with thicker wools or structured materials that resist pressing. If a seam looks like a ridge on the right side of a garment, the clapper is the solution. It exerts even pressure across the surface, ensuring the heat is locked into the fiber structure.
The weight of the wood matters significantly, as lighter, porous woods fail to draw out excess moisture. Always opt for a dense, unfinished hardwood to ensure it effectively wicks steam away from the seam. It is a simple, non-electric tool that lasts a lifetime if kept dry.
Oliso M2 Pro Mini Iron: Ultimate Precision Control

Small-scale projects, such as delicate lace edges or intricate appliqué, require an iron that doesn’t overwhelm the workspace. The Oliso M2 Pro Mini offers concentrated heat in a compact frame, making it ideal for targeting small areas without affecting the rest of the fabric.
Many full-sized irons are cumbersome and lead to accidental creases in finished sections of a garment. The M2 Pro provides a consistent temperature, which is vital when working with synthetic blends that may melt under an uncalibrated iron. Its maneuverability allows for tighter control around curves and tight corners.
While the corded design may feel limiting compared to cordless models, it ensures constant, reliable heat throughout a long pressing session. For the knitter who frequently blocks small components or manages intricate sewing, this precision is worth the desk space.
The Gypsy Quilter Wool Mat: For Flatter Seams
A wool pressing mat serves as a secondary heating surface, essentially pressing the fabric from both sides simultaneously. The density of the wool fibers holds heat, which allows for effective pressing without requiring heavy steam settings.
Using this mat is a game-changer for those sensitive to high heat, as it reduces the need for the iron to do all the work. It provides a grippy surface that prevents fabric from sliding, which is particularly useful when aligning tricky seam intersections. It is also an excellent option for protecting delicate surfaces like wooden tables.
However, be mindful that wool mats require periodic cleaning to prevent dust buildup from transferring to clean projects. Always use a dry press or light steam, as excessive saturation can cause the natural wool scent to intensify. This is a must-have for achieving professional results on non-slip or slippery fabric types.
Clover Roll & Press: For Heat-Sensitive Fibers
Not every seam requires a hot iron, especially when dealing with delicate synthetic yarns or specialty fibers that lose their structural integrity under high temperatures. The Clover Roll & Press allows for the creation of crisp creases through physical pressure alone.
This tool is perfect for heat-sensitive materials where an iron might cause unwanted sheen or fiber flattening. It works by compacting the seam allowance directly, which is often sufficient for finishing edges before final assembly. It is lightweight, portable, and requires no electrical outlet, making it ideal for on-the-go crafting.
While it lacks the fiber-relaxing power of a hot iron, its mechanical action is unparalleled for quick, precise folds. Use it to set a line before moving to a final, lighter press. It is a humble tool that saves fragile fibers from potential heat damage.
June Tailor Point Presser: For Perfect Corners

The point presser is a specialized vertical tool designed to reach into confined spaces that a flat ironing board simply cannot access. It features a sharp, tapered end for pressing points and a long, narrow clapper for flat seams.
When sewing sharp collars or gussets in knitted construction, standard surfaces often cause the fabric to bunch or shift. This tool provides the necessary leverage to flatten those inner corners completely. It is particularly effective for thick, bulky seams that refuse to lay flat on a flat board.
Beginners often overlook the importance of pressing internal angles, which is precisely why some handmade items look inconsistent. Using a point presser ensures the transition between seams is seamless and architectural. It is an investment in structural accuracy that elevates the final look of any garment.
Dritz Tailor’s Ham: For Shaping Curved Seams

A tailor’s ham is the essential counterpart to the flat ironing board, providing the necessary three-dimensional shape for curved seams. Without a curved surface, pressing areas like armscyes, darts, or necklines results in flattened curves and distorted shapes.
The firm yet rounded surface of a ham allows for natural shaping during the pressing process. When working with wool, the ability to steam and shape the fabric over the curve prevents the “dished” or “puckered” look often found in amateur work. It acts as a mold that holds the fabric in place while it cools.
Quality matters here; look for a ham with a durable, non-slip cover and dense, high-quality filling. A soft or loose ham will not provide enough resistance for a proper press. Use it religiously for any piece of a garment that isn’t a straight line.
Collins Point Turner: A Simple, Must-Have Tool
A point turner is an inexpensive plastic or wooden tool used to push out corners from the inside without puncturing the fabric. It is the definitive solution for crisp, clean corners on collars, cuffs, and pocket flaps.
Many crafters reach for scissors or knitting needles to turn corners, which often results in frayed seams or punctured fabric. The Collins Point Turner is designed with a blunt, safe tip that provides maximum pressure exactly where it is needed. It allows the seam to be pushed out fully before the final pressing step.
Consistency is key in garment construction, and turning corners properly is half the battle. Once the corner is turned, use the point turner to nudge the seam allowance flat before applying the iron. It is a small, inexpensive tool that solves a very common, frustrating problem.
How to Choose the Right Pressing Tool for You
Choosing the right tool depends heavily on the scale of your projects and the materials involved. For those working primarily with delicate yarns, prioritize low-heat options like the Roll & Press and the wool mat. Conversely, those constructing heavy wool coats or structured garments require the weight of a tailor’s clapper and the reach of a point presser.
Assess your workspace limitations before investing in large equipment like a full-scale tailor’s ham or point presser. If you primarily work on a small craft table, opt for compact, high-performance tools like the M2 Pro iron. Always match the tool to the specific structural requirements of the project.
Remember that tools should facilitate your workflow, not complicate it. Do not feel obligated to purchase the entire collection at once; start with the tools that address your most frequent “pain points.” As your skills progress, your toolbox will naturally expand to accommodate more complex projects.
The Steam-and-Clap Trick for Razor-Sharp Seams
The most effective method for achieving professional results involves a two-step process known as the steam-and-clap. First, apply steam to the seam allowance using a hot iron for a few seconds to soften the fibers. This makes the fabric pliable enough to be reshaped.
Immediately after lifting the iron, place the wooden clapper firmly over the hot, damp seam and press down hard. Hold it there for several seconds until the heat dissipates and the steam is absorbed into the wood. This “shocks” the fabric into its new, flat position.
The result is a seam that stays perfectly flat indefinitely, even after laundering. This technique is particularly effective for thick materials that tend to spring back after a standard press. It is the single most impactful transition from “made” to “tailored.”
Caring for Your Pressing Tools and Surfaces
Pressing tools are investments that require minimal but regular maintenance to remain effective. Keep wooden tools like clappers and point turners free of moisture buildup, and ensure surfaces stay clean of any iron residue. Wipe down metal iron plates regularly to prevent synthetic fibers from melting onto the surface.
Wool mats should be rotated to ensure even wear and kept in a dry environment to avoid mold or odor. If a tailor’s ham begins to lose its shape, it may need to be repacked or replaced to maintain the structural tension required for pressing. Treat these tools with the same respect as high-quality knitting needles.
A clean, well-maintained tool set ensures that your fabric remains free of snags, stains, and accidental damage. Proper care guarantees that these tools continue to perform at a professional level for years to come. Ultimately, these accessories exist to serve the craft, and their longevity reflects the quality of your finished work.
Proper pressing techniques define the difference between a garment that looks homemade and one that looks heirloom-quality. By selecting tools that match your specific project needs and mastering the art of the steam-and-clap, you gain complete control over the structure and silhouette of your work. Consistency in your pressing routine will undoubtedly raise the standard of every piece you finish.