6 Best Bag Feet For Protecting Knit Bottoms To Use
Keep your knit bags pristine with these 6 top-rated bag feet. Learn which durable, stylish options prevent wear and tear while elevating your handmade crafts.
You’ve spent weeks selecting the perfect wool blend, obsessing over gauge, and weaving in ends to create the bag of your dreams. The moment you set that beautiful knit bottom on a dirty café floor or a rough sidewalk, however, the reality of wear and tear sets in. Adding bag feet is the single most effective way to preserve your hard work and keep your fiber art looking pristine for years. This guide explores the best hardware options to ensure your knitted bags remain as functional as they are beautiful.
Emmakites Heavy Duty Metal Purse Feet: Best Overall


When you need a reliable, no-nonsense solution for a larger tote or a structured market bag, these metal feet are the gold standard. They provide a significant lift, ensuring the knitted fabric never makes direct contact with the ground.
The heavy-duty construction is ideal for bags that carry weight, such as those made with cotton or linen yarns that tend to sag when loaded. Because they are robust, they don’t bend or warp under the pressure of a full bag.
The trade-off here is the weight; they are substantial, so ensure your bag bottom is well-reinforced before installation. If you are using a lighter-weight yarn, these might be overkill, but for a sturdy, long-term project, they are the most dependable choice.
Dritz Purse Feet: Best for Delicate Knit Fabrics
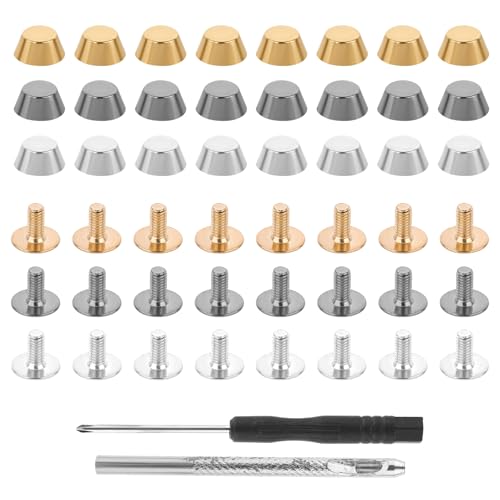
Dritz hardware is a staple in most sewing notions aisles, and their purse feet are excellent for knitters who prefer a smaller, more refined profile. They are less aggressive than industrial-style feet, making them perfect for bags made with softer fibers like merino or alpaca blends.
These feet often feature a smoother finish, which is crucial for preventing snagging on delicate stitches. If your bag features intricate cables or lace, the low profile of these feet ensures the hardware doesn’t distract from the texture of your work.
Keep in mind that these are generally smaller, so they offer less clearance than heavier-duty options. Use these for evening bags or smaller clutches where protecting the fiber is a priority over heavy-duty structural support.
BuckleGuy Solid Brass Bag Feet: Best Premium Choice

If you are using high-end hand-dyed yarns or luxury fibers, you shouldn’t pair them with cheap, plated hardware that might tarnish. BuckleGuy offers solid brass options that age beautifully alongside natural fibers.
These feet are an investment, but they provide a level of security and aesthetic cohesion that mass-produced hardware lacks. Because they are solid brass, they are incredibly durable and won’t flake or peel over time.
For a knitter who treats their projects as heirlooms, these are the obvious selection. They elevate the entire bag, turning a simple knit project into a professional-grade accessory.
Tandy Leather Bag Studs: Best for Rustic Projects

Tandy specializes in leatherworking tools, and their studs are perfect for knitters who incorporate leather bases or straps into their designs. They have a distinct, rugged aesthetic that pairs exceptionally well with wool projects featuring earthy, natural tones.
These studs are designed to pierce through thick materials, which is perfect if you are sandwiching your knit bottom between a leather base and a stabilizer. They feel substantial and have a classic, utilitarian look that complements heavy-gauge yarn.
Be aware that these require a bit more force to set properly. Always use a leather punch or a small awl to create your holes before inserting the studs to avoid damaging your knit fabric.
Mydio Metal Dome Feet: Best for Secure Attachment

Mydio dome feet are designed with a wide base, which helps distribute the weight of the bag more evenly across the fabric. This is a critical feature for knit bags, where the fabric is inherently stretchy and prone to distortion.
The dome shape is less likely to catch on surfaces compared to flatter, sharper designs. This makes them ideal for everyday bags that might get shoved into tight spaces or under seats.
The installation is straightforward, but the wider footprint means you need to be very precise with your placement. Take the time to measure twice before punching your holes, as these feet cover a larger area of your work.
Prym Bag Feet: Best for Easy At-Home Installation

Prym is known for user-friendly sewing notions, and their bag feet are designed for those who might be intimidated by installing hardware. They often come with simple, intuitive backings that don’t require specialized heavy-duty tools.
These are excellent for beginners who are adding hardware to a bag for the first time. The mechanical design is forgiving, allowing you to achieve a secure fit without needing a background in metalworking.
While they are easier to install, they may not be as permanent as screw-back options. Check the tightness of the prongs periodically if you use your bag heavily, as the vibration of daily use can occasionally loosen the grip on soft knit fabric.
Why Your Knitted Bags Need Protective Bottom Feet
Knitted fabric is essentially a series of loops; when those loops rub against a rough surface, they fray and eventually break. Even a superwash wool, which is treated to resist felting, will show signs of abrasion if dragged across concrete or tile.
Beyond physical wear, feet keep your bag off damp surfaces. Moisture is the enemy of natural fibers, leading to mildew or unwanted stretching in the base of your bag.
By adding feet, you create a "buffer zone" that maintains the structural integrity of your bottom panel. It is the single best preventative maintenance you can perform on a handmade bag.
How to Properly Attach Feet Without Snagging Yarn
The most dangerous moment for your yarn is the installation process itself. Never push a metal post directly through a stitch, as you will inevitably split the yarn and create a weak point that will unravel over time.
Always use a rigid stabilizer, such as heavy-duty plastic canvas or stiff felt, between the knit layer and the hardware. Punch your holes through this stabilizer first, then carefully guide the feet through the gaps between your stitches.
If you must go through the knit fabric, use a small dab of clear fabric glue on the hole to lock the surrounding stitches in place. This prevents the metal from migrating and keeps your tension consistent around the hardware.
Choosing Between Screw-Back and Prong-Style Feet
Screw-back feet offer a superior, semi-permanent hold that is perfect for heavy-duty bags. They are tightened with a screwdriver, allowing you to adjust the tension based on the thickness of your knit and stabilizer layers.
Prong-style feet are faster to install and require less hardware, but they rely on bending metal tabs to secure the foot. These are better for lighter bags or projects where you want a more subtle, low-profile look.
If you are a frequent traveler or carry heavy loads, opt for screw-back hardware. If you prefer a quick, aesthetic finish for a smaller project, prongs will get the job done efficiently.
Essential Tips for Reinforcing Knit Bag Bottoms
A bag bottom needs to be rigid to support the weight of your belongings, regardless of how well you knit your base. Use a "sandwich" method: a layer of stiff interfacing or plastic canvas inside the bag, covered by a fabric lining.
When installing feet, ensure they go through all these layers. This distributes the stress of the hardware across the entire base rather than pulling on a single group of stitches.
Finally, consider using a double-stranded yarn or a tighter gauge for the bottom panel. A denser fabric provides a better anchor for hardware, ensuring your feet stay upright and your bag bottom stays flat.
Protecting your knit bags with high-quality feet is a rewarding final step that bridges the gap between a craft project and a functional accessory. By selecting the right hardware and reinforcing your base, you ensure that your stitches remain safe from the rigors of daily use. Take your time with the installation, prioritize stability, and enjoy the confidence of carrying a bag that is built to last. Your future self—and your yarn—will thank you for the extra effort.