6 Craft Sponges For Applying Adhesives For Precision
Achieve flawless results with our top 6 craft sponges for applying adhesives with precision. Click here to choose the perfect tools for your next DIY project.
Precision in adhesive application is as critical as maintaining even tension when working with lace-weight yarn. Whether stabilizing a delicate felted edge or bonding non-slip backing to a handcrafted knitting bag, the right tool ensures a clean finish without unwanted seepage. Selecting the proper sponge for the job prevents the mess that often ruins intricate textile projects. Understanding how different applicators interact with various glues is the secret to professional-looking results.
Ranger Ink Blending Tool: For Glues & Inks


This tool features a circular foam pad attached to a wooden handle, providing a sturdy grip that mimics the ergonomic comfort of a well-balanced knitting needle. The handle design allows for controlled, circular motions, which are ideal when spreading thin layers of adhesive over a localized surface.
It excels when applying contact cement or specialized fabric glues that require an even, thin film rather than a thick puddle. Because the foam is dense, it resists soaking up too much product, ensuring that most of the glue ends up on the project rather than inside the sponge.
The primary tradeoff is the surface area; this is not the tool for large-scale fabric gluing. If you are applying a thin line of adhesive along a hem before sewing a permanent stitch, the Ranger tool offers superior control.
Tsukineko Sponge Daubers: Perfect for Dabbing
Tsukineko daubers are small, finger-mounted sponges that offer an unparalleled level of tactile feedback. Much like feeling the twist of a yarn between thumb and forefinger, these allow for precise, pinpoint application of adhesives.
They are the preferred choice for applying tiny dots of glue to embellishments or securing loose ends in complex embroidery work. Because the fit is snug on the fingertip, the movement feels natural and intuitive, reducing the risk of accidental slips that might stain your work.
However, they are single-task oriented and lack the reach for covering large areas. If the goal is intricate work, such as bonding small beads to a knit garment, these are an essential addition to the workspace.
Darice Foam Brush Set: An Affordable Classic
Foam brushes represent the most straightforward approach to adhesive application, much like a standard wooden needle for basic projects. These brushes are flat, absorbent, and cover ground quickly, making them reliable for larger surface treatments.
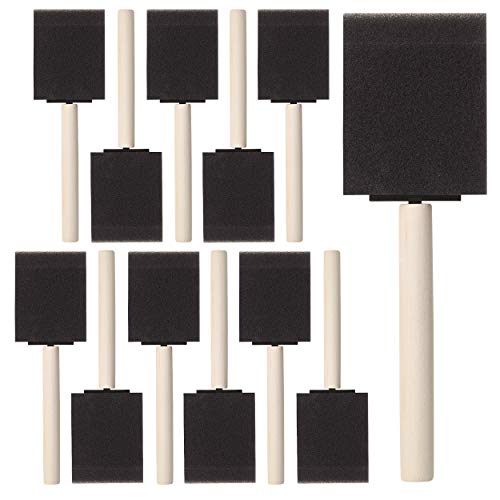
They work best with water-based glues, where a smooth, brush-like stroke is preferred over a dabbing motion. When laminating fabric to a stiffener for a structured bag base, the foam brush ensures total coverage without leaving streaks.
The main disadvantage is their lack of longevity. They tend to tear if used on rough-textured materials like heavy wool felt, and they are generally considered disposable after a single, deep-cleaning session.
Makeup Wedges: The Ultimate Precision Hack
Makeup wedges are a staple in many studios precisely because of their soft, fine-pored structure. They provide a smooth, uniform application that is remarkably similar to the way a fine-gauge knitting needle yields a tight, even fabric.
They are exceptionally good at blending or spreading thick, viscous adhesives without leaving behind clumps or air bubbles. Because they can be easily cut with scissors, you can reshape them to fit into tight corners, such as the inside edge of a structural seam.
These are an affordable, high-performance solution that most crafters overlook in favor of dedicated professional tools. When absolute smoothness is required on a delicate surface, the wedge is often the superior choice.
Speedball Art Sponges: For Smooth Coverage
Speedball sponges are designed for professional artists, offering a refined cell structure that holds liquids consistently. This consistency is vital when working with specialty fabric glues that have specific open times or drying rates.
Unlike standard kitchen sponges, which have large, irregular holes, these offer a uniform texture that prevents “blotching” on the fabric surface. They are resilient and retain their shape well, even after repeated use with thicker adhesives.
While they represent a higher upfront cost, their durability makes them a better investment for frequent users. They are the ideal choice when the integrity of the textile surface must be preserved at all costs.
Royal & Langnickel Sea Sponges: Unique Textures
Sea sponges offer an organic, varied texture that creates a different application result than synthetic foam. They are not designed for smooth, flat coats; instead, they are used to create a stippled, uneven pattern.
If you are working on a project where you need a “tacky” adhesive applied in a non-uniform way—perhaps to create a textured, grip-heavy surface—these are unmatched. The natural holes hold varying amounts of glue, allowing for creative, tactile applications.
- Best for: Specialized texturing projects.
- Avoid: Using them for fine, smooth, or precision-thin layering.
- Tip: Always dampen them slightly before use to improve flexibility.
How to Choose the Right Sponge for Your Glue
Selecting an applicator depends entirely on the viscosity of the adhesive and the texture of the fabric. Thinner, watery glues require denser, less absorbent foams to prevent the sponge from becoming oversaturated and dripping.
- For thin, liquid glues: Use dense, fine-pored synthetic sponges to maintain control.
- For thick, gel-like adhesives: Use stiffer foam brushes that can push the product into the fibers.
- For precision work: Opt for fingertip daubers or custom-cut makeup wedges.
Consider the material you are bonding. A delicate silk-blend yarn requires a much lighter, more controlled touch than a heavy-duty canvas or synthetic felt. Always match the tool’s density to the fabric’s weight to avoid stretching or distorting the material during application.
Cleaning & Reusing Your Adhesive Sponges
Most synthetic sponges can be reused if cleaned immediately after the task. Do not allow the glue to cure, as the chemical bond will make the sponge brittle and unusable for future precision work.
- Water-based adhesives: Rinse immediately under warm running water until the sponge feels “clean” and free of residue.
- Solvent-based adhesives: These usually require a specific cleaner or thinner to dissolve the bond; check the glue’s label for compatibility.
- Drying: Squeeze, do not wring, to prevent tearing the foam structure.
If you are working with a fast-drying adhesive, keep a small bowl of water nearby to drop the sponge in between applications. This keeps the glue from setting in the pores of the foam, extending the life of the tool significantly.
Sponges vs. Brushes for Applying Adhesives
Brushes offer a stroke-based application that is ideal for penetrating deep into a fabric weave or knit structure. However, they often leave “brush marks” or ridges in the adhesive layer.
Sponges, conversely, provide a dabbing or stippling motion that distributes the glue evenly across the surface. While a brush is superior for getting glue into the crevices of a textured yarn, a sponge is far better for creating a smooth, flat bed of adhesive for bonding.
The choice often comes down to the desired final texture. Use a brush if you need the glue to act as a stabilizer deep within the fibers, and use a sponge when you need to laminate two surfaces together cleanly.
Tips for a Wrinkle-Free Glue Application
Wrinkling often occurs when the adhesive is applied too thickly or when the fabric is pulled unevenly during the process. Apply glue in the thinnest layer possible; the stronger the bond, the less adhesive is usually required.
Work from the center of the surface outward toward the edges to push out trapped air pockets. Think of this like blocking a damp garment: smooth the fabric gently with the grain rather than stretching it, which ensures the piece lays flat once the glue sets.
Allow the adhesive to reach its intended tackiness before pressing the pieces together. If the glue is still too wet, the fabric may shift, leading to bubbles or misaligned seams.
Choosing the right tool is just as important as choosing the right fiber for a garment. With the proper sponge in hand, you gain the control necessary to elevate your projects from simple crafts to professional-grade creations.