6 Best Storage Labels For Organizing Dye Pigments
Keep your dye pigments organized with our top six label picks. Discover durable, clear, and stylish options to streamline your workspace and track colors easily.
Dyeing your own yarn is a transformative process that turns a blank canvas of wool or silk into a bespoke masterpiece. However, a disorganized studio filled with unlabeled pigment jars can quickly turn a creative session into a chaotic guessing game. Choosing the right labeling system ensures your color recipes remain reproducible and your workspace stays safe. Here are the best tools to keep your dye pigments perfectly organized for every project.
Avery Water-Resistant Labels: Best Overall Pick


When you are knee-deep in a dye bath, you want labels that won’t turn into a soggy mess the moment a drop of water hits them. Avery’s water-resistant line is the gold standard for the messy reality of a fiber studio.
These labels are designed to withstand moisture and accidental spills, which is inevitable when you are measuring out acid dyes or prepping a soak for a superwash skein. The adhesive is strong enough to stay put on glass or plastic jars, even in high-humidity environments.
The main trade-off here is that they can be a bit tricky to remove if you decide to repurpose your jars for different pigments later. If you want a reliable, professional look that survives the occasional splash, these are your best bet.
Brother P-Touch TZe Tape: Best for Durability

If you are the type of knitter who values precision and wants your studio to look like a high-end laboratory, a label maker is worth the investment. The TZe tapes are laminated, meaning the text is protected by a clear layer of plastic.
This lamination is crucial because pigment dust can be abrasive and messy. Unlike paper labels that absorb oils or dyes, these tapes can be wiped clean with a damp cloth if you accidentally smudge them while weighing out your powders.
Keep in mind that these tapes are semi-permanent; they won’t peel off easily, which is great for longevity but bad if you frequently rotate your inventory. They are perfect for identifying base colors that you use in every single batch.
Dymo Embossing Labels: Best Vintage Aesthetic

There is something undeniably charming about the tactile, raised lettering of a classic Dymo embossing label. For the knitter who loves the "old-world" feel of wooden swifts and ball winders, these labels add a lovely bit of character to your shelves.
Beyond the aesthetics, these labels are remarkably rugged. The plastic tape is naturally water-resistant and the adhesive is surprisingly aggressive, meaning it will stick to almost any surface, including textured plastic lids.
The downside is that they lack the space for detailed technical notes, like chemical composition or batch numbers. Use these for quick identification of primary colors, but keep a notebook nearby for your more complex dye formulas.
ChromaLabel Color-Coded Dots: Best for Sorting

Sometimes you don’t need a name; you just need a visual cue. Color-coded dots are a fantastic way to organize your dyes by category, such as warm tones, cool tones, or even by fiber affinity like protein versus cellulose.
If you are working on a large-scale project—perhaps a gradient shawl that requires a specific palette—you can mark all the necessary pigments with a specific color dot. This allows you to scan your shelves and grab everything you need in seconds.
Be aware that these dots can peel off over time if they are exposed to extreme heat or direct sunlight. They are best used as a secondary organizational layer rather than your primary source of information.
Herma Permanent Film Labels: Best for Jars
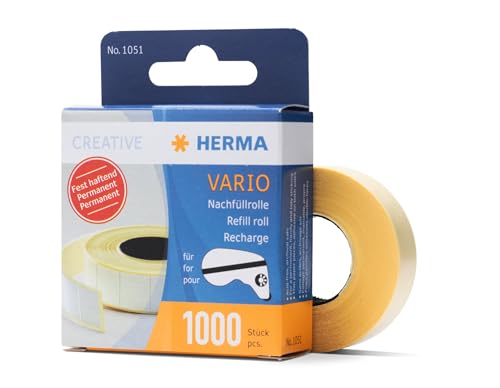
Herma labels are a secret weapon for those who prioritize a clean, professional finish on glass jars. These film-based labels are incredibly thin and clear, allowing the color of the pigment inside to be the star of the show.
They are designed to resist chemicals and moisture, which is vital when you are handling concentrated dye powders. Because they are so thin, they conform beautifully to curved surfaces, preventing that annoying "lifting" at the edges that ruins a tidy shelf.
The primary consideration is the application process; you need a steady hand to get them perfectly straight on the jar. Once they are on, they are there to stay, so ensure your labeling is accurate before you press them down.
Avery Removable Stickers: Best for Testing

Experimental dyeing is where the most creative breakthroughs happen, but it can lead to a graveyard of half-used jars. Removable labels are essential for those "test batches" where you aren’t sure if the color will become a permanent staple in your collection.
These stickers allow you to label a jar for a specific experiment and then peel it off without leaving a sticky, gummy residue behind. This is much better than using masking tape, which tends to degrade and leave a mess after a few weeks in the studio.
While they are convenient, they are not moisture-proof and will fail if you get them wet. Use these for your temporary workspace and upgrade to a permanent label once you have perfected your custom colorway.
Essential Tips for Labeling Dye Pigment Jars
Always include the manufacturer name, the specific color code, and the date of purchase on every label. Dyes can settle or change slightly over time, and knowing the "born on" date helps you troubleshoot why a specific batch might be behaving differently.
- Use a fine-point permanent marker: Even if you use a label maker, keep a backup record on the lid.
- Include the dye type: Clearly mark if the pigment is an acid dye, a fiber-reactive dye, or a natural extract.
- Keep a master log: Your jar label is for quick identification, but your physical notebook is for your legacy.
Never rely solely on your memory, especially when you are mixing custom shades. A label is a promise that you can recreate that stunning teal again next season.
Why Moisture-Proof Labels Matter for Pigments
Dye pigments are hygroscopic, meaning they love to absorb moisture from the air. If you are working in a damp basement or a humid craft room, your jars need to be sealed tightly and labeled with materials that won’t degrade.
A paper label that absorbs moisture can become a vector for mold or simply fall off, leaving you with a mystery jar. Moisture-proof labels act as a secondary barrier, ensuring that the integrity of the jar remains intact.
Investing in quality labels is really an investment in your materials. If a label fails, you risk cross-contamination or losing track of expensive pigments that are essential to your fiber arts practice.
Organizing Your Dye Studio for Efficiency
Efficiency in the dye studio is all about reducing the friction between an idea and a finished skein. Group your jars by color family or by the type of fiber they are intended for—protein (wool/silk) versus cellulose (cotton/linen).
Clear, consistent labeling allows you to see your inventory at a glance. If you know exactly what you have, you are less likely to over-buy and more likely to use what is already on your shelf.
Think of your dye shelf like your yarn stash; if you can’t see it or identify it, you won’t use it. Spend an afternoon organizing, and your future self will thank you when you’re ready to start your next big project.
Safety First: Labeling Toxic Dye Materials
Safety is non-negotiable in the fiber arts. Any pigment that requires a respirator or specific handling precautions must be clearly marked with a "Warning" or "Handle with Care" label.
Never store dyes in food containers, and always ensure your labels are legible to anyone else who might enter your workspace. If a pigment is toxic, consider adding a bright red sticker to the lid as a visual "stop" sign.
Your workspace should be a place of joy and creation, but that requires being diligent about the chemicals you use. Proper labeling is the first line of defense in maintaining a safe, professional, and productive dye studio.
Organizing your dye pigments is much like organizing your needle collection or sorting your stash by fiber content; it is an act of respect for your craft. By choosing the right labels, you create a system that supports your creativity rather than hindering it. Take the time to label your jars properly, and you will find that your studio becomes a more peaceful, productive space for your fiber arts journey. Happy dyeing!