7 Best Needle Identification Tags For Knitting Sets
Keep your knitting organized with our top 7 needle identification tags. Discover durable, easy-to-read labels that simplify your craft and save you time.
We have all been there: staring at a pair of unlabeled circular needles, wondering if they are a 3.5mm or a 3.75mm. When you are deep into a complex lace project, grabbing the wrong size can ruin your gauge and your sanity. These identification tools remove the guesswork, letting you focus entirely on your rhythm and tension. Here are the best ways to keep your needle collection organized and ready for your next cast-on.
ChiaoGoo Needle Size Identification Tags


These tags are designed specifically for the ChiaoGoo interchangeable system, utilizing the signature screw-on mechanism. They are essentially small, threaded metal discs that attach directly to the cable or the needle tip itself.
Because they connect physically to the tool, they are virtually impossible to lose during a project. If you are a knitter who tends to leave projects in progress for weeks, these tags ensure you never have to re-measure your needles after a long break.
The tradeoff here is compatibility; they are primarily built for the ChiaoGoo ecosystem. If you mix and match your needle brands, you might find these don’t fit your other circular sets.
CocoKnits Needle Size Stitch Markers

CocoKnits has mastered the art of functional, stylish organization for the modern maker. Their needle size markers are shaped like small, colorful rings that you can slip onto your needle tips to denote the size.
The beauty of these markers is their versatility; they work on almost any needle, from wooden DPNs to metal circulars. They are lightweight, so they won’t drag on your yarn or distort your stitches if you accidentally knit them into your work.

However, because they are small, they can easily slide off if you aren’t careful when swapping needles. They are best for knitters who keep a dedicated needle case and want a visual reminder of what is currently in use.
Katrinkles Wooden Needle Size Tags
Katrinkles creates beautiful, laser-cut wooden tags that feel like a luxury accessory for your knitting bag. These are often used as dangling charms that you attach to your project bag or directly to your circular needle cable.
They are perfect for the knitter who values aesthetics alongside utility. The wood is smooth, so it won’t snag on delicate fibers like mohair or silk, which is a significant advantage over some sharp metal alternatives.
Keep in mind that these are larger than standard markers. If you are working on a dense, heavy project, a dangling wooden tag might add unnecessary weight to your cable.
Knitter’s Pride Interchangeable Tags
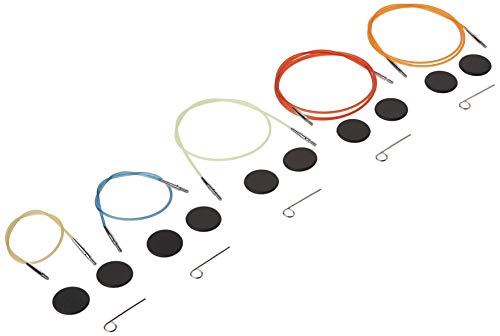
Knitter’s Pride offers a straightforward, no-nonsense identification system that integrates with their interchangeable needle sets. These tags are often color-coded or clearly engraved, making them easy to read at a glance.
They are designed to be durable, standing up to the constant friction of yarn sliding over them. For those who frequently swap tips during a project—perhaps moving from a smaller needle for ribbing to a larger one for the body—these tags provide instant clarity.
The main drawback is that they can sometimes feel a bit bulky if you are knitting with very fine lace-weight yarn. If you find them distracting, consider using them only to label your storage case rather than keeping them on the needles while you work.
Susan Bates Needle Gauge Tag Set
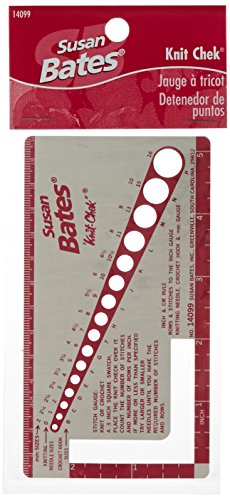
The Susan Bates approach is a classic for a reason: it relies on the traditional, reliable needle gauge tool. Their tag sets often come as a series of small, labeled discs that you can attach to your needle cases or project bags.
These are incredibly accurate and serve as a universal reference point. If you have a collection of vintage needles with faded markings, having a physical gauge tag is the only way to be 100% certain of the size.
The downside is that these tags aren’t meant to stay on the needle while you knit. They are strictly for identification during storage or before you begin your project.
Della Q Interchangeable Needle Tags
Della Q focuses on the "maker’s lifestyle," and their tags reflect that with a focus on organization and portability. These tags are often designed to clip onto the needle case, helping you map out exactly where each size is located in your kit.
They are fantastic for knitters who own multiple sets and need a way to keep their workspace tidy. The design is sleek, professional, and built to last through years of frequent use.
If you are a minimalist, you might find these to be an extra step in your setup process. They aren’t intended to be used on the needles themselves, so they won’t help you if you lose track of the size while the needles are in your hands.
Clover Needle Size Marker Clips

Clover’s marker clips are small, plastic, snap-on pieces that sit snugly on the needle. They are highly visible, which is a massive help if you have multiple projects going at once and need to identify your needle size from across the room.
These are particularly useful for beginners who are still learning to recognize the visual difference between needle sizes. They are inexpensive and easy to replace if one goes missing.
Because they are plastic, they can occasionally catch on very fuzzy or "hairy" yarns like brushed alpaca. Always test your yarn movement before committing to leaving the clip on for a long session.
Why Needle Identification Tags Are Essential
The most common mistake knitters make is assuming they will "just remember" the size of the needles they are using. Between social media distractions, household chores, and the passage of time, that memory inevitably fades.
Using identification tags creates a "source of truth" for your project. This is crucial when you are working with multiple needles of similar sizes—like the difference between a 3.75mm and a 4.0mm, which can be nearly impossible to distinguish by eye.
Beyond just memory, these tags help you maintain consistent gauge across different projects. If you find that a specific needle size works perfectly for your tension with worsted wool, having it tagged ensures you reach for that exact size every time.
How to Organize Your Interchangeable Sets
Organization is the secret to a stress-free knitting life. I recommend using a combination of labeled storage cases and physical tags on the needles themselves.
- Group by material: Keep your bamboo, metal, and carbon fiber needles in separate sections.
- Use a master list: Keep a small card in your needle case that lists every size you own.
- Tag the cable: If you use interchangeable circulars, tagging the cable is often more effective than tagging the tip.
When you finish a project, take the extra thirty seconds to put the needle back in its labeled spot. It feels like a chore in the moment, but your future self will thank you when you’re ready to cast on your next sweater.
Tips for Preventing Needle Size Confusion
The best way to prevent confusion is to verify your needle size every single time you pick up a project. Use a needle gauge tool to double-check the size before you start your first row, especially if you have been away from the needles for a few days.
If you find yourself constantly guessing, it might be time to invest in a set of needles where the size is laser-etched onto the metal or wood. While these can fade over time, they provide a great baseline.
Finally, don’t be afraid to use low-tech solutions like a small piece of painter’s tape on your needle case. Sometimes the simplest fix—writing the size on a piece of tape and sticking it to your needle kit—is the most effective way to stay organized.
Finding the right identification system is a personal journey that depends entirely on your knitting habits and storage space. Whether you prefer dangling wooden charms or sturdy, screw-on metal tags, the goal remains the same: eliminating frustration so you can enjoy the craft. Take the time to set up a system that works for you, and your knitting sessions will be far more productive. Happy knitting, and may your gauge always be exactly what you intended.