6 Best Weeding Tools For Removing Negative Space
Struggling with unwanted gaps? Discover the 6 best weeding tools for removing negative space in your projects. Upgrade your toolkit and refine your designs today.
Just as the right circular needle can prevent hand fatigue during a long lace project, selecting the proper weeding tool is critical for maintaining your momentum when working with vinyl. Whether you are creating custom garment tags or applying intricate iron-on details to a canvas project bag, removing “negative space”—the unwanted bits of vinyl—requires patience and precision. A poor-quality tool acts like a dull pair of scissors on fine mohair, leading to frayed edges and unnecessary frustration. Mastering this process turns the tedious task of cleanup into a rhythmic, satisfying part of the crafting workflow.
Cricut Weeder Tool: The Reliable Go-To for All Vinyl


Think of the standard Cricut weeder as the workhorse 4.0mm bamboo needle of the vinyl world. It is a sturdy, dependable tool that performs reliably across a vast range of standard-weight materials. Its slightly curved hook allows for an ergonomic grip, preventing hand cramping during long sessions of clearing large background areas.
This tool excels when dealing with larger, simpler shapes where the vinyl has enough surface area to resist tearing. Just as one would not use a delicate lace needle for a heavy wool sweater, avoid using this tool for extremely fine, micro-detailing. It functions best when pulling away broad swaths of excess material.
For those just starting out with custom labeling or simple silhouette work, this is the essential base model. It provides the necessary mechanical advantage to lift vinyl cleanly without over-stretching the adhesive backing. It remains the most balanced option for general-purpose projects.
Siser EasyWeeder: A Pro Favorite for a Clean Pull
The Siser EasyWeeder features a unique, sharp tip that prioritizes ease of movement over brute force. Much like choosing a high-quality stainless steel needle for its smooth glide, this tool is designed to minimize resistance as it navigates through dense vinyl layers.
Its ergonomics are specifically tuned to reduce the pressure needed to engage the negative space. When working with heat transfer vinyl (HTV) that has been applied with high pressure, the adhesive can sometimes be stubborn; the sharpness of this tool allows it to puncture and lift without tearing the intended design.
Professional crafters often reach for this when working on high-volume production, such as creating team jerseys or batching personalized gifts. It offers a consistent, clean release that prevents the vinyl from “sticking back” to the carrier sheet. It is a refinement of the standard hook, tailored for efficiency and speed.
Pin Pen Weeder: Best for Intricate, Tiny Details
When you are working with fine, script-like typography or complex, lace-inspired geometric patterns, a standard hook is often too cumbersome. The Pin Pen acts as the equivalent of a sharp 1.5mm steel needle used for knitting a delicate doily. It uses a pinpoint lead to pierce even the tiniest “counter” of a letter—the internal space of an ‘o’ or ‘e’.
Because the tip is exceptionally fine, it allows for surgical precision when dealing with microscopic negative space. It requires a steady hand, as the point is sharp enough to cut through the material if too much downward pressure is applied.
This tool is indispensable for multi-layered projects where alignment is key. By using the needle-like tip, you can nudge vinyl bits into place before final heat setting. Use this exclusively for the “heavy lifting” of tiny, trapped vinyl pieces that wider hooks simply cannot reach.
Nicapa Basic Tool Set: The Best Value for Starters
Investing in a full toolset is akin to buying a starter kit of interchangeable needles; it provides you with options to experiment without committing to individual, high-cost items. The Nicapa set typically includes a hook, a spatula, and tweezers, covering the entire spectrum of the weeding process.
The hook is reliable for standard tasks, while the included spatula is a game-changer for pressing down delicate edges that might want to lift during the weeding process. This prevents the “snagging” effect often seen when weeding intricate designs.
These tools are not built for a lifetime of heavy industrial use, but for the hobbyist, they are exceptionally effective. They offer the best cost-to-performance ratio for someone who is still figuring out their personal weeding style. Treat these as your foundational equipment until specific project demands dictate an upgrade.
Cricut BrightPad Go: Illuminate Your Weeding Lines

The BrightPad Go serves as the light source for your workspace, much like a floor lamp positioned over a dark, navy-blue mohair project. When working with glitter, holographic, or dark matte vinyls, seeing the cut lines can be nearly impossible under standard overhead lighting.
Backlighting your work makes the path of the blade instantly visible, highlighting every cut line with clarity. This dramatically reduces eye strain and helps prevent “weeding errors” where you accidentally pull up a part of the design you intended to keep.
It is particularly useful for those working late in the evening or in craft spaces with sub-optimal natural light. By making the cut lines pop, you gain a massive increase in speed and accuracy. While it is an investment, it fundamentally changes the clarity and comfort of the entire weeding session.
Xuron TweezerNose Pliers: For Ultimate Precision
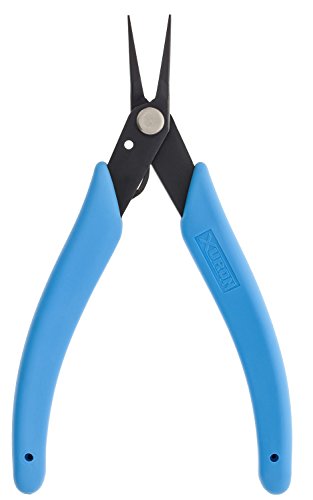
While hooks and pens are great for lifting, there are times when you need the mechanical grip of a pair of pliers. These are the “tapestry needle” of the weeding world, used for final finishing or for pulling out stubborn, small pieces that refuse to release from the carrier.
The Xuron TweezerNose pliers provide a secure, non-slip grip on thin vinyl strands. They are excellent for long, continuous pulls where you want to ensure the vinyl does not snap midway. When you need to exert constant, even tension across a long strip of material, these provide a level of control that hooks simply lack.
They are also highly recommended for individuals with reduced grip strength, as they remove the need for constant finger tension. These are a specialized tool for the seasoned maker who values control above all else. Use them for the final cleanup phase once the bulk of the negative space has been removed.
How to Choose the Right Weeder for Your Project
Selecting the right tool depends entirely on the complexity of your design and the type of material. A large, simple wall decal requires a sturdy hook that can handle long, continuous tension. Conversely, a delicate, small-scale logo requires the surgical precision of a Pin Pen.
Consider the “tack” or stickiness of the vinyl carrier sheet. A high-tack carrier might hold onto the vinyl so tightly that a very sharp, thin tool is required to break the bond. Always match the tool tip diameter to the size of the smallest piece you need to remove.
If you find yourself frequently tearing your vinyl, the issue is often either the depth of the cut or the bluntness of the tool. Assess the design first: if it is intricate, opt for precision tools; if it is bold and broad, opt for high-durability tools.
Weeding 101: Essential Tips for a Flawless Finish
The golden rule of weeding is to work from the outside in. Start by pulling the large border of waste material away, then move to the smaller, internal pieces. This ensures you are not pulling against the weight of the excess material, which reduces the risk of accidental stretching.
Always work in a well-lit area, and do not hesitate to use a magnifying glass if your eyes grow tired. Like checking your stitch count every few rows, pausing to inspect your progress prevents cumulative errors that are difficult to fix later.
Finally, keep your work flat. Lifting the vinyl carrier sheet up while weeding can cause the material to curl or snap, potentially ruining your hard work. Keep the carrier sheet adhered to the work surface to maintain the stability of the design.
Reverse Weeding vs. Standard: Which to Use When
Standard weeding—removing the negative space while the design stays on the carrier—is the default for most HTV projects. It is straightforward and allows you to keep the design intact until the moment of pressing. Use this for all standard iron-on applications.
Reverse weeding, however, is a technique where you remove the design from the carrier and transfer it onto a piece of transfer tape before applying it to your garment or surface. This is essential when working with sign vinyl or intricate, multi-colored designs that require perfect registration.
If your design consists of many small, disconnected parts, reverse weeding is your best friend. It acts like a “blocking” process for vinyl, securing all the separate elements in their precise locations before they are moved to the final project. It takes more time, but it guarantees alignment that is otherwise impossible to achieve.
Troubleshooting Common Vinyl Weeding Headaches
When the vinyl tears repeatedly, check your cutting blade depth; it may be set too shallow. If the vinyl won’t release from the backing, you are likely pulling at an angle that is too sharp. Always pull back the material against itself, folding it back, rather than pulling it straight up away from the surface.
If small pieces are lifting when you don’t want them to, use the flat end of a spatula or a squeegee to burnish (rub) the design firmly back onto the carrier sheet. Think of this as “blocking” a knitted garment to ensure the lace pattern is perfectly opened and secured.
Lastly, do not fight the vinyl. If a section is persistently difficult to weed, stop and re-evaluate. It is far better to trim away the problematic area with a pair of scissors and weed it in smaller, more manageable sections than to force a tear that ruins the entire project.
By applying the right tool to the right task, you can move through the weeding process with the same confidence and fluidity as a master knitter working through a complex cable repeat. Consistent technique and high-quality tools are the difference between a project that feels like a chore and one that produces a beautiful, professional finish.