6 Best Measuring Tools For Custom Fit Mittens
Stop guessing your size with these 6 best measuring tools for custom fit mittens. Follow our expert guide to ensure perfect comfort. Shop our top picks today.
Achieving the perfect mitten fit is a rite of passage for every knitter, moving beyond simple tubes to structured, wearable accessories. Without precise measurements, even the most beautiful hand-dyed wool can result in a mitten that is either frustratingly tight or annoyingly baggy. The difference between a comfortable, warm mitten and a shapeless one lies entirely in the tools used to calibrate dimensions. Investing in the right measuring instruments transforms mitten knitting from a guessing game into a predictable, professional process.
Clover Soft Tape Measure: The Everyday Essential


A flexible tape measure is the most fundamental tool for capturing the organic curves of a human hand. The Clover soft tape is a staple because it resists stretching over time, ensuring that measurements taken today remain accurate after months of heavy use. Unlike rigid plastic tapes that can kink or snap, this soft variety wraps smoothly around the knuckles and palm.
Accuracy depends on consistent tension during the measuring process. If the tape is pulled too tightly, the resulting mitten will cut off circulation; if held too loosely, the fabric will bunch awkwardly around the thumb gusset. This tape measure provides a reliable, neutral baseline that avoids the measurement drift often found in cheaper, hardware-store alternatives.
For those prone to losing track of tools, the vibrant colors and high-contrast markings on these tapes make them difficult to misplace in a busy knitting bag. It is the workhorse of the toolkit, ideal for measuring palm circumference and hand length from wrist to fingertip. The bottom line: a non-stretching, high-visibility tape is non-negotiable for consistent sizing.
Cocoknits Ruler and Gauge: For Perfect Swatches

Swatching is the moment of truth for any mitten project. The Cocoknits Ruler and Gauge is designed specifically to isolate a four-inch square, preventing the common mistake of miscounting stitches. Because the tool is made of a sturdy, thin material, it lays completely flat against the fabric without distorting the stitches.
Many beginners struggle with the “swatch-to-mitt” transition, often failing to account for how weight or blocking affects their fabric. This tool includes precise cutouts for measuring needle size, which helps verify that the chosen needles are actually the size they claim to be. A subtle discrepancy of even 0.5mm in needle diameter can be the difference between a dense, windproof mitten and a drafty, loose one.
Using this tool forces a disciplined approach to gauge. By providing a framed window, it prevents the eye from wandering during the count. It is an essential asset for anyone working with delicate yarns where stitch definition is paramount to the final look.
Neiko Digital Caliper: For Ultimate Precision
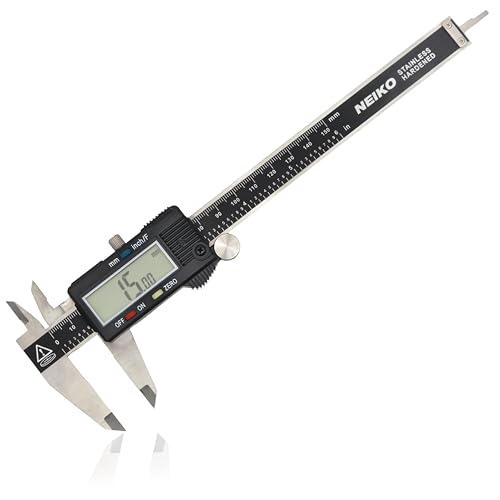
The Neiko digital caliper is an enthusiast’s secret weapon for high-stakes projects involving intricate patterns or precious, expensive fibers. While a tape measure handles broad dimensions, a caliper provides sub-millimeter precision for measuring needle tips and cable thickness. This level of detail is vital when working with small, fine-gauge needles where sizing variations are common.
For mitten makers, this tool is most useful for verifying gauge when working with unusual yarn weights or when substituting yarns. If a pattern calls for a specific millimeter size but the available needles feel slightly “off,” a quick check with the caliper confirms the reality before a single stitch is cast on. It removes the ambiguity of imprecise plastic needle gauges.
Admittedly, this tool is overkill for simple garter stitch projects using chunky wool. However, if the goal is to master complex, heirloom-quality mittens that require a precise fit, the digital readout eliminates human error. It is a precision instrument for those who refuse to leave their gauge to chance.
The Knitter’s Hand: A Must-Have Sizing Chart

Having a reliable reference chart is just as important as having a physical ruler. A dedicated sizing chart provides the industry-standard dimensions for small, medium, and large hands, allowing for quick adjustments to a pattern. Relying on a chart prevents the common mistake of assuming a hand is “standard” without verifying against the pattern’s suggested measurements.
These charts help bridge the gap between pattern instructions and actual physiology. If a pattern suggests 7 inches for a palm circumference but the target hand measures 8 inches, the chart provides the mathematical guidance needed to add stitches proportionally. It is the bridge between a static pattern and a custom, tailored fit.
Always remember that these charts represent a starting point, not an absolute law. Use them as a baseline to compare against the actual hand measurements of the recipient. A chart is only as good as the adjustments the knitter makes to accommodate individual anatomy.
Knit Picks WPI Tool: Decode Your Mystery Stash
The Knit Picks WPI (Wraps Per Inch) tool is the definitive way to handle mystery yarn or stash remnants. By wrapping the yarn around the tool’s grooves, you can determine its weight category, which is crucial for determining if a yarn will yield the correct gauge for a mitten pattern. Using an unknown yarn without testing the WPI often leads to mittens that are significantly too large or too small.
This tool is especially effective for those who mix and match fibers, such as pairing a superwash merino with a mohair strand. Understanding how these fibers interact is easier when you have confirmed the underlying WPI of each. It takes the guesswork out of yarn substitution, preventing the heartbreak of knitting an entire cuff only to realize the fabric is too airy for winter weather.
The physical nature of the tool—a simple, notched guide—makes it foolproof to use. It replaces the messy, inconsistent practice of wrapping yarn around a ruler. If there is even a hint of doubt regarding a yarn’s weight, running it through the WPI tool is the most efficient safeguard.
Dritz Retractable Tape: For Knitting on the Go
A retractable tape measure is the best choice for the mobile knitter who works on projects in transit. The Dritz version is specifically favored for its smooth retraction mechanism, which doesn’t snag or bind as the tape is pulled out or re-wound. It keeps the measuring tape clean and tangle-free inside a project bag, protecting the markings from wear.
While it lacks the absolute rigidity of a dedicated sewing ruler, it is more than sufficient for checking the length of a mitten as it grows on the needles. The compact size makes it a permanent resident in any knitting pouch. It is the ultimate convenience tool for ensuring progress is measured without disruption.
The convenience of a retractable tape encourages more frequent measuring, which is a habit all successful mitten knitters should cultivate. It is small, discreet, and always available. When it comes to everyday utility, the retractable tape is rarely outperformed.
How to Measure Your Hand for a Perfect Mitten Fit
Measuring a hand correctly requires two primary data points: the circumference of the palm at the widest point and the length from the base of the wrist to the tip of the middle finger. To measure the circumference, wrap the tape around the palm just below the knuckles, keeping the thumb tucked in or held to the side. Ensure the tape is snug but not compressing the skin.
For the length, measure from the inside crease of the wrist up to the tip of the middle finger. Add half an inch to this measurement to account for the ease needed to move the fingers comfortably. Never measure over a thick sweater or sleeve, as this will artificially inflate the dimensions.
Always measure the dominant hand, as it is typically slightly larger. If the mitten is for a gift, look for a friend of similar height and build to use as a proxy. Precision at this stage prevents the need to unravel the project halfway through.
Why Your Gauge Swatch Is Truly Non-Negotiable
A swatch is not merely a practice run; it is a vital diagnostic tool. In mitten knitting, gauge determines the structural integrity and warmth of the final piece. A swatch that is too loose will result in gaps that let in the wind, while a swatch that is too tight will make the mitten stiff and uncomfortable.
Always block the swatch exactly as the finished mitten will be treated. If the yarn is a delicate alpaca, it will bloom and expand significantly after a soak, potentially changing the gauge by several stitches. Measuring a dry, unblocked swatch is a recipe for a project that grows too large after the first wash.
Consider the swatch a promise of what the final fabric will be. If the gauge is incorrect, adjust the needle size before starting, not after. No amount of blocking can fix a fundamentally flawed gauge.
Understanding Negative Ease for Super Snug Mittens
Negative ease is the concept of designing a garment to be smaller than the actual body measurements to ensure a form-fitting, secure hold. For mittens, negative ease is essential because the fabric must be flexible enough to allow for finger movement without the mitten sliding off. Typically, 0.5 to 1 inch of negative ease is recommended for the palm circumference.
If a mitten has zero or positive ease, it will feel loose and lose the warmth-trapping ability of the fiber. However, too much negative ease creates tension that can distort the stitch pattern and make the mitten painful to wear. The goal is to create a snug, second-skin fit that moves naturally with the hand.
Use the pattern’s schematic as a guide, but trust the physical measurement of the wearer. When in doubt, a slightly snug fit is usually better than a loose one, as most natural fibers will relax and stretch slightly with body heat and wear. Balance the elasticity of the chosen yarn with the desired snugness for the best results.
Flexible vs. Rigid Rulers: When to Use Each Type
Flexible tools are superior for measuring three-dimensional shapes like the palm or the curve of the thumb gusset. They conform to the anatomy of the hand, providing an accurate reading that a rigid ruler simply cannot capture. Use a flexible tape whenever you are measuring a person or a project currently on the needles.
Rigid rulers, such as a wooden or metal yardstick, are best suited for flat surfaces. They are the ideal choice for measuring a flat-blocked swatch or checking the length of a finished mitten when it is laid out on a table. Using a rigid ruler on a round object will inevitably result in measurement errors.
The choice between the two is defined by the geometry of the task. Keep a flexible tape for organic, curved surfaces and a rigid ruler for flat, technical verification. Using the wrong tool for the task is a common shortcut that compromises the final fit.
A well-fitted pair of mittens is a blend of accurate measurement and thoughtful preparation. By leveraging these six tools, you can ensure that every stitch serves a purpose and every pair is crafted for comfort and longevity. Happy knitting!