6 Best Felt Tip Pens For Bold Animal Designs
Discover the 6 best felt tip pens for bold animal designs. Elevate your creative sketches with these top-rated picks. Shop our expert recommendations today!
Translating a bold animal design into a knitting chart requires precision tools that handle paper and fabric with equal grace. Whether sketching a complex fox motif on grid paper or marking guidelines directly onto a canvas for embroidery, the right pen prevents frustration and wasted yarn. Choosing between archival-quality ink and fabric-specific pigment depends entirely on how the tool interacts with fiber density. This guide navigates the essential markers needed to turn creative vision into a tangible, knitted masterpiece.
Sharpie Stained Fabric Marker: Best for Fabric


The Sharpie Stained marker uses a specialized ink designed specifically for textile fibers. Unlike standard permanent markers that bleed into unruly shapes, this ink stays contained within the immediate application area.
It performs best on tight-knit fabrics or stiffened canvases where ink migration is a constant threat. Because it is oil-based, it creates a crisp line that withstands the manipulation of blocking and long-term handling.
This marker is the ideal companion for marking internal structural lines on a project bag or decorative animal motifs on tote bags. Expect a bolder line weight, which makes it less suitable for delicate lace-weight charts and better for robust, graphic shapes.
Faber-Castell Pitt Artist Pen: For Charting

Faber-Castell Pitt pens are the gold standard for long-term charting because they use India ink, which is both lightfast and odorless. For a knitter working on a long-term intarsia project, this means the lines drawn on the grid will not fade or yellow over the months of construction.
These pens are exceptionally reliable for drafting animal silhouettes on graph paper. The ink dries almost instantly, ensuring that a stray hand movement doesn’t smear a carefully plotted eye or whisker detail.
Different nib sizes allow for a tiered approach to design. A fine nib can map out the individual stitches of an animal’s face, while a larger, brush-style nib can block in solid color fields for easy visualization.
Tulip Dual-Tip Fabric Markers: Budget Fabric Pick
Tulip markers provide a versatile, two-in-one solution that helps keep a workspace uncluttered. With a fine tip on one end and a broad tip on the other, the knitter can move from outlining an animal’s silhouette to filling in a large, bold color section without switching tools.
While these are accessible and budget-friendly, they behave differently than high-end archival markers. They perform best on synthetic blends or cotton fabrics that have been pre-washed to remove sizing agents.
If the goal is to draw a quick pattern reference on a piece of scrap fabric for a stranded colorwork test, these markers are more than sufficient. Just be mindful of the ink saturation, as it can occasionally bloom if the tip is held against the fabric for too long.
Copic Sketch Marker: For Pro-Level Design Work
Copic markers are preferred for designers who treat their knitting charts as works of art. The alcohol-based ink provides a seamless, streak-free blend that is perfect for visualizing shading on fur or complex animal markings.
Because these markers are refillable and feature replaceable nibs, they represent a significant long-term investment. They are not intended for fabric, but they are unmatched for rendering design concepts on paper before they ever touch the needles.
When color-grading is essential to the project, the range of grays and tones available in the Copic line is superior. This allows for clear distinctions between different color values in a chart, which is vital when working with yarn shades that appear similar in low light.
Sakura Pigma Micron: For Fine-Line Tracing
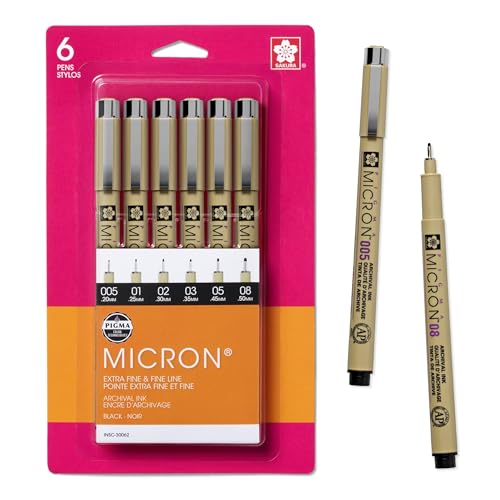
Sakura Pigma Microns are the essential tool for transferring intricate animal designs onto tracing paper or vellum. Their consistency is unmatched, ensuring that every stitch plotted on the graph paper corresponds exactly to the final product.
The archival ink ensures that the chart remains a permanent part of the project record. For those who keep binders of their original designs, these pens prevent the degradation of lines that often occurs with lower-quality stationery.
The extreme precision of the 005 and 01 sizes is particularly helpful when working with high-gauge projects. If the project requires mapping out stitches at a density of 8 to 10 stitches per inch, these fine-line markers are the only way to keep the chart legible.
Arteza Fabric Markers: Best Vibrant Color Set
Arteza markers stand out for their pigment density and color range, which is critical when a project involves multiple, distinct animal species or bold, contrasting color-blocks. A diverse palette helps distinguish between varied yarn colors that might otherwise blur together on a flat page.
These markers work well on lighter-colored natural fibers, such as undyed wool or cotton canvas. They are designed to withstand washing, which is useful if the marked fabric is intended to stay with the finished piece as a liner or decorative backing.
Always perform a patch test on a small, hidden piece of the specific yarn or fabric being used. The texture of the fiber will significantly change how the ink spreads, and it is better to discover this on a test swatch than on a finished heirloom piece.
Paper vs. Fabric Pens: What a Knitter Needs
Paper pens are designed for absorption and clarity, focusing on crisp lines that don’t blur on cellulose fibers. Fabric pens, conversely, are engineered for adhesion and permanence against the repeated friction and moisture of the knitting process.
Never use a fabric marker on your primary paper charts. The ink is often thicker and intended to bond with textile sizing, meaning it will likely feather and ruin the fine grid lines of your knitting pattern.
When deciding which to stock, look at the project stage. Use archival paper pens for the “brain” work—drafting and iterating on charts—and reserve specialized fabric markers for the “body” work, such as marking labels, structural points, or custom fabric project bags.
How to Heat-Set Your Fabric Pen Designs
Heat-setting is the process of using heat to bond the pigment molecules to the textile fibers, rendering them permanent. Without this step, fabric marker designs will inevitably fade during the first blocking or washing of the project.
After the ink has fully dried, place a clean piece of scrap cotton over the design to act as a barrier. Apply a dry iron—no steam—for three to five minutes, pressing firmly but without excessive sliding to avoid smudging the ink while it is still vulnerable.
Wait at least 24 hours after marking before performing this step to ensure all solvents have evaporated. If you skip this, the ink might lift or smear onto your needles or high-quality yarn during the blocking phase.
Charting Animals: From Sketch to Final Grid
Mapping an animal design requires translating organic curves into the rigid structure of a knit stitch. Begin by drawing the silhouette on plain paper, then layer a piece of translucent grid paper over it to align the shapes with the grid.
Simplify the anatomy until the lines align with the vertical and horizontal flow of the stitches. A sharp, clear angle is often better than a soft curve, as it is much easier to replicate with standard increases and decreases.
If an animal’s eye or nose falls between grid intersections, adjust the shape so it occupies a full stitch. This ensures the colorwork remains crisp and the transition between colors doesn’t look muddied when viewed from a distance.
Preventing Bleeds on Your Fabric and Paper
Bleed occurs when the ink spreads along the fibers before it has a chance to dry, ruining the integrity of a design. To combat this, always work on a firm, non-porous surface, such as a glass cutting mat or a plastic-coated table.
Test the flow on a scrap piece of the same material before applying the marker to the main piece. If the ink spreads, you are likely moving the pen too slowly or the fabric has too much loose “nap” or fluff on the surface.
If the fabric is particularly absorbent, treat the area with a light, non-staining fabric stabilizer before drawing. This binds the fibers together and creates a smooth surface for the ink to sit on top of, rather than sinking deep into the yarn structure.
The path from a sketch of a woodland creature to a finished, color-stranded garment requires both patience and the correct selection of marking tools. By matching the right pen to the specific medium, you ensure that every planned detail makes it onto the needles exactly as intended. Invest in tools that support the longevity of your craft, and your design records will remain as vibrant and precise as the day they were drawn.