7 Best Stitch Markers For Identifying Right Side
Struggling to track your fabric’s right side? We review 7 top stitch markers that simplify orientation, ensuring your knitting projects remain error-free.
Every knitter has experienced the sinking feeling of realizing they’ve been working on the wrong side of a project for the last ten rows. Distinguishing the right side from the wrong side is essential, especially when working complex cables or intricate lace patterns. Using a dedicated marker acts as a visual anchor, saving you from the tedious process of ripping back hours of hard work. These seven markers offer distinct advantages for ensuring your project stays on track from cast-on to bind-off.
Cocoknits Colorful Nylon Opening Stitch Markers


These markers are a favorite in my knitting bag because they are incredibly smooth and snag-free. The nylon coating ensures they glide over your needles without catching on delicate fibers like silk or mohair.
Because they are opening markers, you can slip them into a stitch mid-row if you realize you’ve forgotten to mark the start of your right side. Their vibrant colors make it impossible to miss them, even in low light or while knitting with dark-colored yarns.
The primary tradeoff is that they are slightly larger than metal rings, which can be distracting if you are working with very fine lace weight yarn. However, for most worsted or DK weight projects, they are the gold standard for visibility and ease of use.
Clover Locking Stitch Markers for Easy Placement

Clover’s locking markers function like a safety pin, which makes them incredibly versatile for identifying the right side of your work. You can clip them directly into the fabric rather than just sliding them onto your needle.
This is a game-changer when you are working on circular projects or complex garments where you need to mark a specific section. They stay securely in place, meaning you won’t lose your spot even if you toss your project into a bag.
Do be careful when using these with fuzzy yarns like brushed alpaca or mohair, as the locking mechanism can occasionally snag the halo of the fiber. If you stick to smooth, plied wools, these are arguably the most reliable markers for long-term project tracking.
Katrinkles Wooden Right Side Indicator Markers
If you appreciate the tactile experience of knitting, these wooden markers are a beautiful, functional addition to your toolkit. They are often laser-etched with "RS" or specific designs, providing an unmistakable visual cue.
Unlike plastic or metal, wood has a natural grip that prevents the marker from sliding around too much on your needles. This makes them excellent for beginners who might accidentally drop a stitch if their markers are too slippery.
The downside is that they are thicker than metal alternatives and can leave a small, temporary gap in your stitches if you leave them in for too long. I recommend using these as a "reminder" marker that you move up every few rows rather than leaving it in the same stitch for the duration of the project.
Tulip Heart-Shaped Locking Stitch Markers
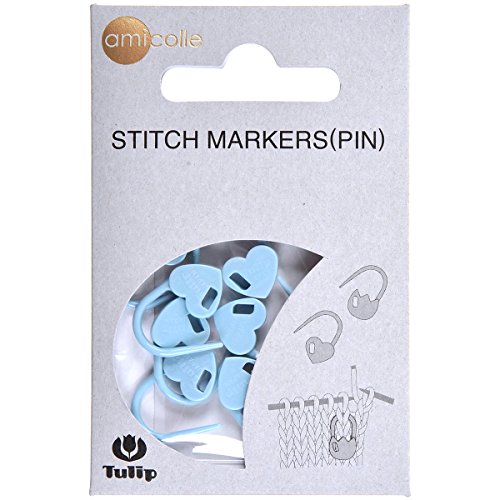
Tulip is renowned for their precision engineering, and these heart-shaped markers are no exception. They are incredibly lightweight, which is vital when you are knitting a large sweater and don’t want the weight of your markers to distort your gauge.
The heart shape isn’t just for aesthetics; it provides a unique tactile feel that helps you identify the right side by touch alone. If you are a "blind" knitter who likes to work while watching a movie, this physical distinction is a huge help.
Because they are quite small, they are perfect for sock knitting or projects using fine gauge needles. They won’t pull on your stitches, but they might be a bit fiddly for knitters with limited dexterity.
Knitter’s Pride Rainbow Metal Locking Markers

Metal markers are my go-to for heavy-duty projects where plastic markers might snap or bend. These rainbow-colored locking markers are durable, sleek, and provide a satisfying "click" when they lock shut.
The vibrant colors allow you to color-code your work, such as using a specific color to indicate the right side and another for stitch repeats. This level of organization is essential for complex colorwork or lace where you need to track multiple variables simultaneously.
The only real drawback is their weight; if you have a hundred of them on a project, they can start to drag on the needles. Use them sparingly as indicators, and you’ll find they are the most robust option in your collection.
Susan Bates Split Ring Markers for Quick Access

Split ring markers are the classic choice for a reason: they are simple, effective, and require no moving parts. You simply slide them onto the needle, and they stay put until you decide to move them.
These are perfect for knitters who find the locking mechanisms of other markers to be too time-consuming to open and close. If you are working on a simple stockinette scarf or a basic hat, these are the fastest way to mark your right side.
Be aware that because they are "open" on one side, they can sometimes slip off if your needle tips are very tapered. They work best on needles with a more blunt tip, which helps keep the marker safely on the shaft.
Dritz Plastic Locking Stitch Marker Assortment

Dritz markers are the reliable workhorse of the knitting world, often found in local craft stores and easily accessible to everyone. They are inexpensive, come in large packs, and are sturdy enough to last through multiple projects.
Having a large assortment means you can mark the right side of every single project you have on the needles without worrying about running out. They are excellent for beginners who are still learning how to manage their tools and might misplace a marker or two.
While they lack the elegance of wooden or specialized metal markers, their functionality is unmatched for the price. They are the perfect "everyday" marker for when you want to focus on the knitting rather than the equipment.
Why Right Side Markers Improve Knitting Accuracy
Identifying the right side is the difference between a professional-looking garment and a piece that looks "off." When you consistently mark the right side, you ensure your cables, lace, and increases are always oriented correctly.
Many knitters rely on the "tail" of their cast-on to identify the right side, but this becomes impossible once you’ve worked several inches of fabric. A marker provides a permanent, unambiguous signal that eliminates guesswork.
This is especially critical when you are picking up your knitting after a break of several days. A quick glance at your marker tells you exactly where you are, preventing the common mistake of knitting a row in the wrong direction.
How to Choose the Right Marker for Your Yarn Weight
The weight of your yarn should dictate the size and material of the marker you choose. For fine lace weight or fingering weight yarn, you need a thin, lightweight marker that won’t distort the stitch or create a ladder.
If you are working with bulky, rustic wool, you can afford a larger, heavier marker. In fact, a larger marker is often better here, as it won’t get lost in the thick, textured stitches.
- Lace/Fingering: Use thin metal rings or small, lightweight plastic hearts.
- DK/Worsted: Use nylon opening markers or medium-sized locking markers.
- Bulky/Super Bulky: Use large, durable plastic or wooden markers for maximum visibility.
Best Practices for Tracking Your Project Progress
Consistency is the secret to successful project tracking. Always place your right-side marker in the same relative position, such as the first stitch of the row or immediately after the start-of-round marker.
If you are working a pattern with a repeat, don’t just mark the right side—mark your repeats as well. This creates a "map" of your fabric that makes it easy to spot a dropped stitch or a missed increase before it becomes a major problem.
Finally, remember to move your marker up every few inches. Leaving a marker in the same stitch for weeks can cause the yarn to stretch, creating a visible "pucker" in your finished fabric that even blocking might not fully fix.
Investing in the right markers is a small step that pays off in massive dividends for your sanity and the quality of your finished work. Whether you prefer the sleek feel of metal or the gentle touch of wood, the best marker is the one that you actually use consistently. Don’t be afraid to experiment with different types until you find the perfect match for your knitting style. Happy knitting, and may your right side always be easy to find.