6 Best Cable Tightening Tools For Secure Needle Joins
Ensure smooth knitting with our top 6 cable tightening tools. Learn how these essential accessories prevent snagging and keep your needle joins secure.
Every knitter knows the sinking feeling of a cable unscrewing mid-row, turning a meditative session into a frantic rescue mission for dropped stitches. A secure join isn’t just about convenience; it is the foundation of a smooth, snag-free knitting experience. Whether you are working with slippery silk or toothy wool, the right tightening tool ensures your needles stay put. This guide explores the best tools to keep your circular needles locked tight and ready for your next project.
ChiaoGoo Stainless Steel Cable Tightening Key


The ChiaoGoo T-shaped key is the gold standard for many, simply because its design offers excellent leverage. It slides perfectly into the small hole on the needle’s threaded end, providing a sturdy anchor point while you twist the cable.
Because ChiaoGoo cables are memory-free and highly durable, they deserve a tool that matches their industrial strength. The metal construction of this key means it won’t bend or snap under the pressure of a firm, final tightening twist.
However, keep in mind that the small hole can be easy to miss if you are working in low light. Always ensure the key is seated fully before applying torque to avoid marring the metal finish.
Addi Click Interchangeable Needle Grip Pad

If you prefer a tool-free approach, the Addi Click rubber grip pad is a game changer. It provides the necessary friction to grip both the needle tip and the cable base, allowing you to twist them together without needing a mechanical key.
This is particularly useful for knitters who suffer from hand fatigue or joint pain. The pad acts as a buffer, giving you a wider surface area to grasp, which translates to more power with less localized pressure on your fingers.
Be aware that these pads can lose their "tackiness" over time as they collect skin oils and dust. A quick wash with mild dish soap and air-drying will usually restore their original gripping power.
KnitPicks Options Interchangeable Needle Key

The KnitPicks key is a classic, minimalist wire loop that gets the job done without any fuss. It is designed specifically for the brand’s threaded connections, making it a reliable companion for those who have built a collection of their wooden or metal tips.
Because the wire is thin, it can sometimes feel slightly flimsy if you are overtightening. The trick is to use it as a stabilizer rather than a lever; hold the needle firmly and use the key merely to prevent the cable from spinning.
If you find yourself losing these frequently, keep one attached to your project bag with a small safety pin. They are small enough to disappear into the depths of a yarn bowl, so having a dedicated "home" for them is essential.
Lykke Interchangeable Needle Tightening Tool

Lykke tools are designed with the same aesthetic care as their beautiful driftwood needles. These keys are often shaped slightly differently than standard wire loops, providing a more ergonomic handle that is easier to grip for those with larger hands.
When working with Lykke’s smooth, polished wood, the secure join is vital to prevent the yarn from catching on the transition point. A loose join on a wooden needle can lead to "fiber snagging," where the yarn ply gets caught in the gap and eventually frays.
Always check your join after the first few rounds of a project. Wood can expand and contract slightly with humidity changes, which can occasionally cause a perfectly tight join to loosen just a hair.
HiyaHiya Interchangeable Needle Rubber Gripper
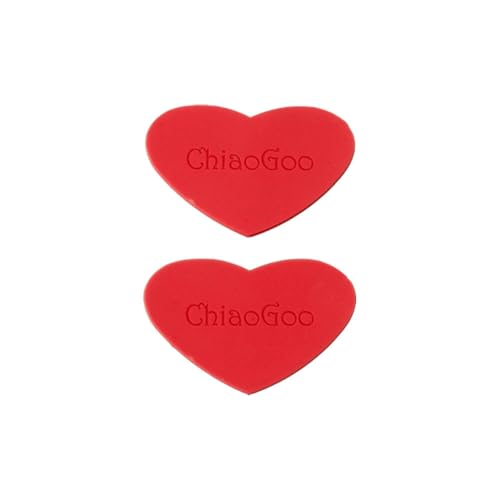
HiyaHiya provides a rubberized, circular gripper that functions similarly to a jar opener. It is excellent for knitters who find the metal keys uncomfortable or who worry about scratching the finish of their high-end needles.
This gripper is particularly effective when you are switching between different tip materials, such as moving from stainless steel to bamboo. The rubber provides a consistent, non-slip interface regardless of the needle’s surface texture.
Since these are small and easy to misplace, I recommend keeping a set in your primary project bag. They are incredibly durable and, unlike metal keys, they won’t poke holes in your needle cases or project bags.
Knitter’s Pride Interchangeable Needle Key

Knitter’s Pride keys are reliable, utilitarian tools that fit most standard interchangeable systems. They are straightforward, effective, and usually come in multi-packs, which is a blessing for those of us who seem to have a "black hole" in our craft rooms.
The key works best when you use the "two-handed approach": hold the needle in one hand and the cable in the other, using the key only to prevent the cable from rotating. This prevents you from putting excessive stress on the threads themselves.
Avoid the temptation to use pliers or other household tools to tighten your needles. The delicate threads on your needle tips are easily stripped, and once those threads are damaged, no amount of tightening will keep the connection secure.
Why Tightening Your Needle Joins Matters Most
A secure join is the difference between a professional-looking garment and one with unsightly ladders or dropped stitches. When a join is loose, the transition between the cable and the needle tip creates a tiny "step" that catches your yarn.
This catching is more than just an annoyance; it can actually compromise your gauge. If you are constantly tugging on the yarn to get it over a snagged join, your tension will fluctuate, leading to uneven stitches throughout the fabric.
Furthermore, a loose cable is a recipe for disaster in complex lace or colorwork. You want your focus on the pattern, not on worrying whether your cable is about to detach and send your hard work sliding off the end.
How to Use a Cable Key Without Damaging Threads
The most common mistake is over-tightening, which can lead to stripped threads or a needle that is impossible to unscrew later. Use your key to provide resistance, but let your fingers do the actual tightening work.
Ensure the threads are perfectly aligned before you start twisting. If you feel resistance immediately, back it off and try again; forcing a cross-threaded connection is the fastest way to ruin a high-quality needle tip.
- Check alignment: Ensure the threads are clean and free of yarn fuzz.
- Don’t force it: If it feels stuck, stop and re-seat the cable.
- Use the key as a stop: Only use it to hold the base steady, not as a lever to crank the connection.
Troubleshooting Common Interchangeable Needle Snags
If your yarn is still catching even after tightening, check for "burrs" or tiny imperfections at the join point. Sometimes, a microscopic piece of dried glue or a manufacturing flaw can create a snag that no amount of tightening will fix.
If the join is secure but the yarn still feels like it’s dragging, you might be dealing with a mismatch in size between the cable and the needle. Always double-check that your cable and tip are from the same manufacturer or are explicitly stated to be compatible.
If you find that your cables are constantly loosening during a long project, try a tiny dab of beeswax on the threads. It acts as a mild thread-locker and makes the eventual unscrewing process much easier.
Essential Maintenance Tips for Needle Connections
Treat your needles like the precision instruments they are. Every few projects, take a moment to wipe down the threads with a soft, dry cloth to remove any lint, dust, or residue from the yarn.
If you are using metal needles, be mindful of oxidation or buildup. A quick rub with a clean cloth keeps the threads smooth, ensuring that the cable screws on and off with minimal effort.
Store your cables in a way that prevents them from kinking, as a kinked cable puts unnecessary torque on the join. A happy cable leads to a secure join, which ultimately leads to a more enjoyable and successful knitting experience.
Investing in a reliable tightening tool is a small step that pays dividends in your knitting longevity and comfort. By understanding the mechanics of your specific needle system and treating your connections with care, you eliminate the most common source of mid-project frustration. Remember, the goal is to spend your time creating beautiful fabric, not fighting with your equipment. Keep your tools clean, your joins secure, and your stitches consistent.