7 Best Craft Tools For Decorative Edging To Own
Elevate your paper projects with our top 7 craft tools for decorative edging. Explore these essential supplies to create professional, intricate designs today.
Finishing a project is often where the most critical decisions are made regarding the final aesthetic and durability of the piece. While yarn choice and stitch pattern lay the foundation, the edging determines how the item holds its shape and reflects the maker’s intent. Selecting the right tools for decorative edging transforms a standard garment into a professional-grade heirloom. This guide explores seven essential tools that bridge the gap between basic construction and refined, intentional design.
Fiskars Easy Action Pinking Shears: Best for Fabric


Pinking shears are essential for anyone working with non-knit facings or fabric linings that require a stabilized edge. These shears create a zigzag pattern that prevents fraying on woven fabrics, acting as a functional yet decorative finish.
The Easy Action mechanism is a critical design choice for those with hand fatigue or repetitive strain. By using a spring-loaded handle, the tool opens automatically after each cut, significantly reducing the pressure required to move through multiple layers of fabric.
When trimming a seam allowance on a heavy wool coat or a delicate silk lining, these shears provide a clean, secure edge without the bulk of turned-under seams. However, always test the cut on a scrap piece first, as the depth of the “teeth” can vary and might be too aggressive for lightweight synthetics.
Clover Amour Crochet Hook Set: For Added Borders

Adding a crochet border to a knitted piece is the fastest way to stabilize a rolling stockinette edge. The Clover Amour series is highly regarded for its ergonomic grip, which keeps the wrist neutral even during the long hours required to work around a large shawl perimeter.
The aluminum hook tip is perfectly tapered, allowing it to slide into tight knitted stitches without splitting the yarn. This is particularly important when working with plied wools that tend to fray when pierced by inferior hook designs.
If you are prone to tight tension, the smooth coating on these hooks ensures the yarn glides effortlessly. While some prefer wooden hooks for their “grab,” the consistency of these metal hooks makes them the industry standard for picking up stitches or finishing hems.
Olfa Scalloped Rotary Blade: For a Wavy Edge
Rotary cutters are not just for quilting; they are precision tools for creating consistent, decorative edges on felted knits or heavy woven materials. Replacing a standard straight blade with a scalloped edge blade turns a simple cutting mat into a design studio for custom trims.
This tool produces a soft, feminine wave that mimics lace without the complexity of actual needlework. It is exceptionally effective when you want to reduce the bulk of a hem on thick felted wool, as the scalloped shape removes unnecessary fabric weight.
Use a dedicated acrylic ruler to guide the cutter for perfectly straight, repeatable waves. Be aware that this tool requires a sharp, dedicated cutting mat to ensure the scallops are cut cleanly through the entire thickness of the fiber.
Clover Large Pom-Pom Maker: For Fun, Fluffy Trim

Pom-poms have moved beyond kitsch to become a sophisticated finish for heavy winter cowls and throw blankets. The Clover Large Pom-Pom Maker offers a mechanical advantage over the traditional cardboard cutout method by providing a structural frame that ensures even density.
The secret to a professional pom-pom is the tightness of the center tie. By using this tool, you can pack a significantly higher volume of yarn into the frame, resulting in a dense, spherical finish that won’t fall apart or look stringy after a few weeks of use.
Choose your yarn fiber carefully; wool is excellent for holding shape, while acrylic can sometimes appear flat or limp. Trim the edges of the pom-pom with sharp, pointed scissors to create a perfect, fuzz-ball silhouette that rivals high-end retail accessories.
Tulip I-Cord Knitter: For Sleek, Applied Edges

An I-cord is a narrow, tube-like knitted strip that provides a clean, professional finish to blanket edges or necklines. The Tulip I-Cord Knitter automates the process, creating uniform, corded trim at a fraction of the time required to work it by hand.
This tool is a game-changer for those who want the look of a couture finish without the tedious labor of working hundreds of tiny stitches on double-pointed needles. The resulting cord is incredibly consistent, which is essential for applied edges where any variation in gauge would be immediately visible.
Ensure the yarn weight matches the internal mechanism of the knitter to avoid jamming. Smooth, round-plied yarns perform best here, as textured or roving-style yarns often snag on the internal hooks.
Lacis Fringe Twister: For Professional-Looking Fringe
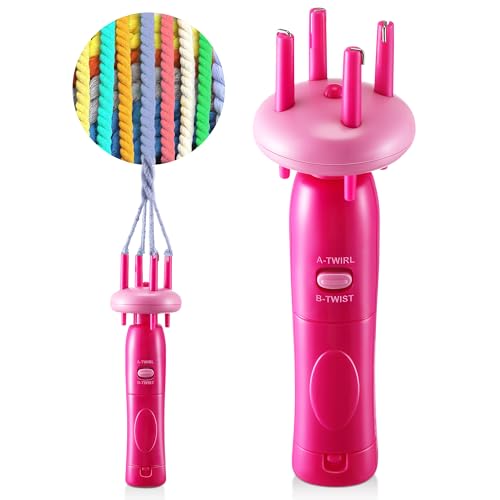
Fringe adds movement and flair to scarves and shawls, but messy or uneven fringe ruins the look of an otherwise beautiful garment. The Lacis Fringe Twister uses a simple mechanical gear system to rotate multiple strands of yarn simultaneously.
By twisting the fringe, you create a rope-like texture that is far more durable and visually interesting than simple, hanging yarn ends. This tool keeps all strands at identical tension, preventing the dreaded “lumpy” look that often happens when twisting by hand.
Always knot the base of the fringe before twisting to ensure the strands do not unravel over time. Use this on non-superwash wools for the best “grip” between the fibers, as the twist will set and hold more effectively than on slick, synthetic yarns.
Dritz Loop Turner: The Unsung Edging Hero
A loop turner is a simple metal rod with a latch hook that saves hours of frustration when working with fabric-based edgings. If you are creating custom bias tape or fabric loops to sew onto your knits, this tool allows you to turn narrow fabric tubes right-side out in seconds.
It is particularly useful for creating button loops or decorative fabric ties that match your project’s color palette. Without this tool, attempting to turn a narrow tube of fabric often results in frayed edges or uneven seams.
Insert the rod through the fabric tube, hook the end, and pull it back through the center. It is a deceptively simple mechanical solution that adds a layer of refinement to the transition between knitted and sewn materials.
Choosing an Edging Tool for Your Project Type
Selecting the right edging tool requires balancing the weight of your yarn with the desired function of the edge. If your project is a lightweight summer top, avoid heavy fringes that will pull the fabric out of shape; instead, opt for a light crochet border that mimics the drape of the garment.
Conversely, for a heavy wool blanket, a crochet border or a thick pom-pom finish adds necessary weight and structural integrity. Always consider the “stretch” factor of your base material before committing to a rigid edging, as a mismatch can cause the piece to ripple or pucker.
- For stabilization: Crochet hooks or I-cords work best to reinforce stretching edges.
- For aesthetics: Pom-poms or decorative scalloped blades offer visual impact.
- For functionality: Pinking shears and loop turners prepare your materials for clean, professional assembly.
Knitted vs. Crocheted Edges: Key Differences
Knitted edges, such as an applied I-cord, create a seamless, integrated look that flows naturally from the body of the work. They are generally more elastic and better suited for necklines or cuffs that need to stretch while retaining their shape.
Crocheted edges, on the other hand, provide a firmer, more decorative frame that acts as a structural anchor. Because crochet stitches are essentially a series of locked loops, they do not stretch as much as knitting, making them ideal for preventing the “roll” often found in stockinette stitch fabrics.
When deciding between the two, ask yourself if the edge needs to be functional (stretchy and soft) or decorative (structured and framing). If you are new to edging, a crochet border is generally faster to rip back and redo if the tension isn’t quite right.
Caring for Your Cutting Tools: Shears & Blades
The longevity of your cutting tools depends entirely on how they are stored and what materials they touch. Never use your fabric shears or rotary blades to cut paper, as the fibers in paper are abrasive and will dull a precision-ground edge instantly.
Clean your blades regularly with a soft cloth to remove lint and residue from natural fibers. A drop of sewing machine oil on the pivot point of your shears will keep the action smooth and prevent the metal from rusting, which is vital if you live in a humid climate.
Always store your blades in their original protective cases or a dedicated tool roll. A small nick in a rotary blade or a dull spot on your shears will create jagged edges that look unprofessional and can eventually lead to fabric fraying.
The right edging tool acts as the bridge between a handmade craft and a finished garment. By investing in quality instruments and understanding how each one alters the drape, weight, and durability of your work, you elevate the quality of your entire fiber arts practice. Experiment with these tools on swatch samples to discover which techniques complement your personal style and preferred yarn weights. With the right foundation, any project can achieve a refined, polished finish.