
7 Best Pattern Drafting Curves For Pattern Making
Elevate your sewing projects with our expert guide to the 7 best pattern drafting curves for pattern making. Click here to choose the right tools for your kit.
Pattern drafting is the bridge between a simple schematic and a garment that fits like a second skin. Just as selecting the right needle size for a specific yarn weight determines the drape of a sweater, choosing the correct curve ensures professional-looking armscyes and smooth side seams. These tools are the compasses of the design world, guiding lines that would otherwise wobble into awkward, ill-fitting shapes. Master these instruments, and the transition from following patterns to drafting custom silhouettes becomes an achievable reality.
Dritz Styling Design Ruler: Best for Beginners


The Dritz Styling Design Ruler is a true multi-tool, combining the functions of a French curve, a hip curve, and a straight edge into one convenient template. It is perfect for the designer who feels overwhelmed by a wall of specialized plastic tools.
When drafting a new sweater pattern or modifying an existing one, simplicity often prevents costly cutting errors. This ruler features markings for seam allowances and buttonhole placement, making it a reliable companion for small adjustments.
While it lacks the extreme precision of professional-grade individual tools, it provides an excellent entry point. Consider this the circular needle of the pattern world: it covers almost every basic task with ease and efficiency.
Fairgate Vary Form Curve: The Pro’s Hip Curve

The Fairgate Vary Form Curve is a heavy-duty tool designed for those who draft garments with complex, non-linear transitions. Crafted from tempered aluminum, it offers the kind of structural integrity that plastic alternatives simply cannot match.
In pattern making, the hip curve is essential for shaping the lower sections of tunics or long-line cardigans. A wobbling line in a hip curve leads to puckered seams, which is the last thing anyone wants after investing hours into a hand-knit or sewn piece.
This tool is a lifetime investment. If the goal is to draft patterns that stand up to repeated use and adjustments, metal is the superior choice.
L-Square Ruler: Essential for Perfect Right Angles
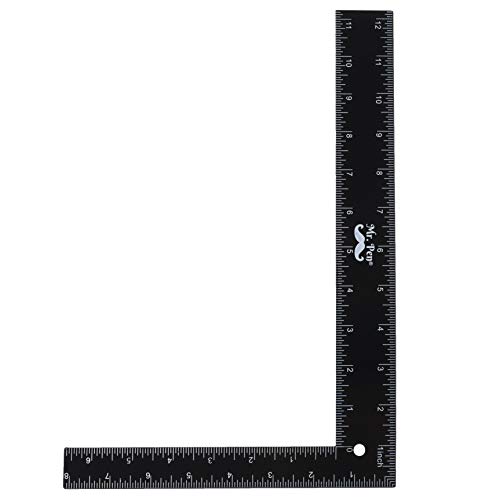
An L-Square ruler is the foundation of any drafting workspace, acting as the primary tool for establishing the grainline and perpendicular intersections. Without perfect right angles, patterns become distorted and panels refuse to align during assembly.
Think of this like a blocking board for knitwear; it ensures everything is square, consistent, and geometrically sound. Whether marking the base of a sleeve head or checking the alignment of a front placket, this tool eliminates guesswork.
Opt for a clear or calibrated version to see underneath the ruler while marking. Accuracy at the drafting stage is the only way to avoid the frustration of uneven hems or twisted seams later on.
Classic French Curve Set: For Flawless Necklines
French curves are a collection of specialized shapes designed to create smooth, flowing lines in tight areas. For garments like round-neck sweaters or shaped armholes, these curves are the difference between a professional finish and a homemade look.
The set usually includes various shapes, each catering to a different degree of curvature. Choosing the right one is similar to selecting the correct cable needle size; you want a snug fit that allows the line to transition naturally without harsh angles.
Never force a curve to fit a shape it wasn’t designed for. Move the ruler across the paper, connecting the dots in small, incremental segments to maintain a smooth, professional arc.
Flexible Curve Ruler: For Custom and Unique Shapes
The flexible curve ruler is a moldable strip that can be bent into any position and held there by internal wire or friction. It is the only tool that allows for “tracing” a shape from an existing, well-fitting garment without damaging the fabric.
If a sweater pattern calls for a specific, non-standard armhole shape, this tool maps it perfectly. It is the ultimate problem solver for those awkward, irregular curves that rigid templates just cannot accommodate.
Understand that these tools are not for drawing straight lines; they are for capturing existing geometry. Use them as a reference tool to replicate curves that have already proven their fit during a previous project.
Sew-be-Doo Grader: Easiest for Pattern Grading
Pattern grading is the process of scaling a design up or down while maintaining the intended proportions. A dedicated grading ruler simplifies this by having multiple offset lines, allowing for quick, consistent resizing of patterns.
For the designer who wants to offer patterns in a full range of sizes, this tool saves immense amounts of mental energy. It takes the arithmetic out of drafting, leaving more time for focusing on design aesthetics and yarn choice.
Accuracy here is paramount. A millimeter of error in grading can compound across a large garment, leading to significant sizing discrepancies. Use a sharp, thin pencil when marking through these rulers to maintain the integrity of the graded line.
Lance 24″ Hip Curve: A Durable, Go-To Standard
The Lance 24″ Hip Curve is a workhorse tool that bridges the gap between portability and professional capability. Its length allows for long, sweeping curves, which are essential for creating flattering shapes in cardigans and skirts.
A long, continuous curve is always preferable to multiple small segments, which often lead to unsightly “dog legs” or corners. This tool ensures that the slope of a side seam is smooth from waist to hem.
Its durability means it will likely survive drops and heavy daily use in a busy workshop. If you only buy one specialized curve, a high-quality 24-inch hip curve is the most versatile choice for garment shaping.
How to Choose the Right Curve for Your Project
Selecting the right curve depends entirely on the complexity of the design. A simple drop-shoulder sweater requires minimal curves, whereas a tailored, set-in sleeve garment demands a full suite of French and armscye tools.
- For beginners: Start with a multi-purpose tool that combines several functions.
- For custom fitting: Prioritize a flexible curve to capture body dimensions accurately.
- For professional grading: Invest in a dedicated grading ruler to ensure consistency.
Always consider the scale of the pattern. Small, intricate garments need smaller, tighter French curves, while larger outerwear pieces require the long, gradual arcs of a hip curve.
Plastic vs. Metal Rulers: Which Should You Buy?
Plastic rulers are lightweight, often transparent, and very affordable, making them excellent for occasional drafting. However, they can warp over time and are susceptible to nicks from rotary cutters or exacto blades.
Metal rulers, specifically those made of aluminum or stainless steel, are incredibly durable and offer a “dead” weight that helps them stay put on the table. They are the professional standard for a reason: they don’t deform and they hold up to years of daily use.
If you are just beginning, start with plastic to see which shapes you reach for most often. Once you identify your core tools, upgrade those specific items to metal versions for a lifetime of precision.
Using Your Rulers: How to “Walk” a Seamline
“Walking” a seamline is the process of pivoting your ruler along the path of two joining edges to ensure they are the same length. This technique is identical to checking that the stitch count on a sweater front matches the stitch count on the back before joining at the shoulder.
Align the ruler at the start of the seam, mark a small intersection, then rotate the ruler to follow the curve, marking again where the previous segment ended. This ensures that even when dealing with complex, curved pieces, the edges will meet perfectly without the need for excessive easing or gathers.
Never guess when joining two curved edges. Walking the seam is the ultimate insurance policy against the frustration of having one pattern piece longer than the other during assembly.
Successful pattern drafting is an exercise in patience and precision, much like the process of mastering a complex lace pattern. With the right set of curves in your kit, you gain the ability to turn a flat piece of paper into a structural masterpiece that complements the body. Remember that tools are merely an extension of your creative intent; keep them clean, store them flat to prevent warping, and always measure twice before the final cut. Happy drafting.
