6 Masking Tapes For Creating Adhesive Boundaries To Trust
Discover 6 masking tapes for creating adhesive boundaries to trust in your creative projects. Click here to choose the right professional tools for your space.
Finding your place on a complex lace chart or keeping track of row increases mid-project is a challenge every knitter faces. Adhesive boundaries act as a tactile anchor, preventing eyes from wandering and reducing the risk of errors in intricate patterns. Selecting the right tape requires balancing strong adhesion with the delicate nature of printed paper or fragile pattern printouts. The following guide explores the best tools to help maintain focus and precision during long knitting sessions.
ScotchBlue Original: The All-Purpose Workhorse


This tape is a staple in many sewing and craft rooms for a reason. Its medium adhesion level is designed to stay put on a variety of surfaces without leaving a sticky residue when peeled away.
For knitters working with printed PDF patterns, this tape offers a reliable way to highlight a specific row or section. The blue color creates a high-contrast visual barrier that is easy to spot even in dim lighting.
However, consider the paper weight of the patterns. On standard printer paper, the tack may be slightly too strong, leading to minor fiber tearing upon removal. Always opt for this tape when using thicker cardstock or laminated pattern sheets.
FrogTape Multi-Surface: For The Sharpest Lines

FrogTape features PaintBlock Technology, which is marketed for preventing paint bleed, but it serves a unique purpose for knitters. Its edge-sealing capability ensures the tape lies perfectly flat against the chart, preventing the corners from curling during extended use.
This tape is ideal for those who prefer to mark vertical boundaries on colorwork charts. Its precise edges allow for exact alignment with the grid lines of a pattern.
Be mindful that the adhesion is designed to be quite firm. It is best reserved for patterns that are intended to be kept long-term and do not require frequent repositioning.
MT Washi Tape: Best for Marking Knitting Charts

Washi tape is the superior choice for those who frequently move their boundary line as they work. It is made from decorative paper with a low-tack adhesive that is gentle enough for even the most delicate tracing paper.
The variety of patterns and colors available allows for color-coding different sections of a complex cable pattern. Use a bright, patterned tape for row increments and a solid, muted tape for the main boundary to reduce visual clutter.
Because it is semi-translucent, it does not completely obscure the information underneath. This makes it a perfect tool for checking progress without removing the marker entirely.
Scotch Delicate Surface: Protect Your Patterns
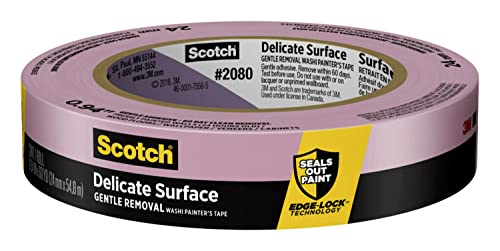
When a pattern is printed on thin, fragile paper, aggressive adhesives are the enemy. Scotch Delicate Surface tape is specifically engineered to have a lower tack, ensuring that the tape lifts away cleanly every time.
This tape is the gold standard for vintage patterns or photocopies where the ink might be prone to lifting or smearing. It provides just enough grip to stay in place while navigating a project bag.
Avoid using this on surfaces that are heavily textured or damp. The low-tack nature means it may not adhere well if there is significant humidity in the workspace, which can occur in rooms where blocking is actively taking place.
Pro Tapes Artist Tape: The Reusable Chart Line
Artist tape is designed for professionals who need to mount and move sketches without damaging the substrate. It is highly flexible and features a matte finish, which is excellent for reducing glare under bright task lamps.
This tape is particularly helpful for those who use a magnetic board for their charts but need a physical marker that stays in place if the magnets slip. It holds firmly to paper but peels away with almost no resistance.
Consider purchasing a vibrant neon color to make the boundary pop against black-and-white printouts. It is a durable choice that will survive being tossed into a project bag repeatedly.
UHU Patafix Putty: A Reusable Tape Alternative
While not a tape in the traditional sense, adhesive putty offers a unique solution for knitters who dislike the residue or peeling issues associated with adhesives. Small amounts can be placed at the corners of a pattern sheet to hold it onto a wall or a flat surface.
This is an excellent option for those who knit from patterns posted on a wall-mounted display. It allows for quick adjustments and infinite reusability without ever needing to replace a roll.
Exercise caution when using this on fabric-covered surfaces or delicate wallpapers. The oily components in some putties can leave a faint mark if left pressed against a surface for several months.
What Is Tack? Understanding Tape Adhesion Level
Tack refers to the initial “stickiness” or gripping power of the adhesive. High-tack tapes are designed for permanent or semi-permanent bonding, while low-tack tapes are intended for temporary positioning.
For knitting charts, high-tack is generally undesirable. It increases the risk of damaging the paper or ripping the edge of a pattern that needs to be moved every row or two.
Always look for the term “removable” or “low-tack” on the packaging. These labels indicate the product has been tested to release without pulling paper fibers or adhesive residue away from the target surface.
How to Test Tape Before Committing to a Project
Before applying tape to a final pattern, conduct a small test on a scrap piece of the same paper. Apply the tape firmly, press it down with a thumbnail, and leave it for at least ten minutes.
Peel the tape back slowly at a 45-degree angle. Observe whether the surface of the paper remains intact or if there is any visible “frosting” or tearing.
If the tape leaves a residue or tears the paper, it is too aggressive for the intended use. In such cases, dab the adhesive side of the tape against a clean sleeve or pant leg once to reduce the tack before applying it to the chart.
Removing Tape Without Tearing Your Patterns
The technique used to remove tape is just as important as the tape brand itself. Never pull the tape off quickly or at a sharp 90-degree angle, as this increases the leverage on the paper fibers.
Instead, peel the tape slowly and keep it close to the surface of the paper. If the tape is particularly stubborn, use a hair dryer on a low, cool setting to gently warm the adhesive, which can soften the bond and allow for easier release.
If you encounter resistance, stop pulling immediately. Lift from the other side or use a thin blade to gently nudge the edge of the tape up without digging into the paper.
Tape vs. Post-its for Tracking Pattern Rows
Post-it notes are convenient for short-term tracking but often fall short for long-term projects. The adhesive strip on a Post-it is limited to one edge, which causes the note to flip, curl, or fall off if the pattern is moved frequently.
Tapes offer a full-length boundary, which is significantly more effective at guiding the eye across a wide row of complex colorwork or lace charts. They provide a structural barrier that ensures you stay on the correct row even if you get distracted mid-stitch.
Choose tape over Post-its for any project expected to last longer than a few days. The consistency of the boundary line prevents the “lost row” syndrome that often leads to errors in counting and cable placement.
Maintaining focus on your stitches is the final hurdle in turning a complex pattern into a finished heirloom. By choosing the right adhesive boundary, you simplify your workflow and protect the longevity of your printed resources. Whether opting for the soft grip of washi tape or the sharp precision of artist tape, these small investments pay off in reduced errors and a more meditative, fluid knitting experience.